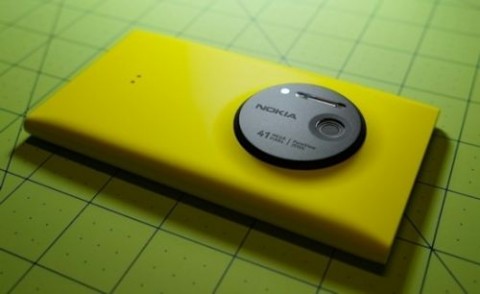
一 : 为何1200万像素摄像头的iPhone6s拍照提升并不明显?

苹果最新的iPhone6s将摄像头的像素首次提升到了1200像素,这本是一件令人高兴的事情,但是,随后各大媒体的手机拍照评测显示,iPhone6s和iPhone6s Plus的拍照排名并不理想,那么,为何提升了摄像头像素的iPhone6s拍照提升不明显呢?本文来一一为你解答。

经常拍照的用户一定都知道,要拍出一张好的照片,光线非常重要,同样在光线充足的环境下拍出来的照片可能本身并没有什么区别,但是,如果在室内或夜间等环境光线较暗的场景下,就会发现拍出来的照片噪点很多。

而CMOS就是相机感光的主要核心部件,CMOS的面积越大,所能接收到的光线就越多,而CMOS的像素越多,每个像素所能得到的CMOS面积也就会相应的减小。μm(微米)就是每一个像素的大小单位,数字越大,则每个像素的面积就越大,收集光线的能力也就越强,但是,像素总量也就相应的减小。

在这里举个栗子,HTC曾经推出的HTC One这款手机采用了UltraPixel这个概念,就是让每一个像素的单位面积增大到2μm,做为对比,苹果的iPhone5s的像素面积为1.5μm,但是,这也就直接导致了这款手机的摄像头只有430万像素。
毕竟手机的空间十分有限,要兼顾美观和拍照效果,摄像头的CMOS感光元件就无法做的非常大,否则就像某些以拍照做为卖点的手机,摄像头会比一般手机要大得多,美观度也会打折扣。
所以,如果在CMOS面积不变的情况下,手机厂商就要在像素数量和每个像素大小之间做一个取舍。为何iPhone此前一直所采用的800万像素摄像头的拍照效果要好于很多更高像素摄像头的手机,就是因为此前iPhone摄像头的像素面积为1.5μm,这也是苹果一直没有将摄像头的像素数量提高的原因。
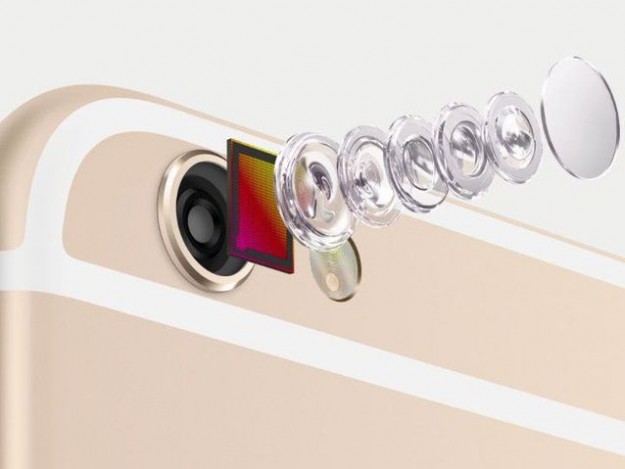
而这一代的iPhone6s和iPhone6s plus,苹果首次将iPhone的摄像头提升到了1200万像素,但是,这也就直接导致每个像素从1.5 μm下降到了1.22μm,虽然使用了“深槽隔离”技术来减小拍摄时产生的杂讯,但是,在感光能力上来说,iPhone6s无疑要差于iPhone6。
苹果如果要保持iPhone摄像头每个像素面积不变,又要增大像素总量,那么,摄像头就要做的更大,这显然会使手机整体的美观度打一些折扣。所以,苹果最终选择了我们看到的保持摄像头大小不变,增大像素总量,减小像素面积的做法,这也就使得iPhone6s的拍照效果相比前代来说,提升并不明显。
当然,即便如此,对于用户来说,iPhone6s的拍照表现也足够优秀,相信在下一代的iPhone7上,苹果会拿出更好的解决方案,来近一步提升iPhone的拍照效果。
二 : DELPHI实现摄像头拍照
procedure Tfrm1.Button2Click(Sender: TObject);
Var
jpeg: TJPEGImage;
bmp: TBitmap;
MyStm:TMemoryStream;
strfilename,strcard:String;
begin
inherited;
strfilename:=extractfilepath(Application.ExeName);
with DBEdit12.DataSource.DataSet do
begin
if not VideoCap1.SaveAsDIB then
begin
ShowMessage('拍摄照片失败');
Abort;
end;//
bmp:= TBitmap.Create;
try
bmp.LoadFromFile(strfilename+ 'Capture.bmp' );
MyStm:=TMemoryStream.Create;
jpeg:= TJPEGImage.Create;
try
jpeg.Assign( bmp );
jpeg.compress;
jpeg.SaveTofile( strfilename+'Capture.jpg');
strfilename:=strfilename+'Capture.jpg';
jpeg.LoadFromFile(strfilename);
jpeg.SaveToStream(MyStm);
MyStm.Position:=0;
OpenQry(query1,'select count(1) as cnt from tb_photo where
card_no='''+strcard+'''');//先查找是否有此卡号
OpenQry(pubqry,'select * from tb_photo where card_no='''+strcard+'''');//打开卡号数据表
{OpenQry是自定义打开数据表的函数
OpenQry(qry1:TQuery,ssql:String);
begin
with qry1 do
beign
if active then
close;
sql.clear;
sql.add(ssql);
try
open
catch
on E: Exception do ErrorDialog(E.Message, E.HelpContext);
end;//try
end;
end;
}
with query1 do
begin
if pubqry.Fields[0].AsInteger >0 then //先判断此卡号的图片是否存在,若存在,替换;否则,插入。
Edit
else
Insert;
FieldByName('card_no').AsString :=strcard;
TBlobField(FieldByName('photo')).LoadFromStream(MyStm); Post; //统一提交
end;//with
finally
MyStm.Free;
jpeg.free;
end; //try
finally
bmp.free;
end;//try
end;//with
end;
//请首先下载TVideoCap控件
三 : Flex实现的上传摄像头拍照并将UI保存为图片
flex客户端代码:复制代码 代码如下:
<?xml version="1.0" encoding="utf-8"?>
<s:Application xmlns:fx="http://ns.adobe.com/mxml/2009"
xmlns:s="library://ns.adobe.com/flex/spark"
xmlns:mx="library://ns.adobe.com/flex/mx" minWidth="955" minHeight="600" creationComplete="application1_creationCompleteHandler(event)">
<fx:Script>
<![CDATA[
import mx.controls.Alert;
import mx.core.UIComponent;
import mx.events.FlexEvent;
import mx.graphics.codec.JPEGEncoder;
import mx.rpc.events.FaultEvent;
import mx.rpc.events.ResultEvent;
import mx.utils.UIDUtil;
protected function application1_creationCompleteHandler(event:FlexEvent):void
{
initCamera(videoDis);
}
//初始化Camera控件,并添加在VideoDisplay
public function initCamera(videoDis:UIComponent):void
{
var myCamera:Camera = Camera.getCamera();//获取客户端摄像头
myCamera.setMode(500,500,30);
var myVideo:Video = new Video(500,500);
myVideo.attachCamera(myCamera);//获取摄像头的视频流
videoDis.addChild(myVideo);
}
//将可视的UIComponent组件转换为图片
public function UItoBitmap(source:UIComponent,target:UIComponent):void
{
var width :int = source.width;
var height :int = source.height;
var bitmapData:BitmapData =new BitmapData(width,height);
bitmapData.draw(source,new Matrix());
var bitmap:Bitmap=new Bitmap(bitmapData);
var uic:UIComponent = new UIComponent();
uic.addChild(bitmap);
target.addChild(uic);
}
//将可视的UIComponent组件保存为本地图片
public function UISaveAsImg(imgID:UIComponent):void
{
var width :int = imgID.width;
var height :int = imgID.height;
var bitmapData:BitmapData =new BitmapData(width,height);
bitmapData.draw(imgID);
var byteArr:ByteArray = bitmapData.getPixels(new Rectangle(0,0,width,height));
var byteArr123:ByteArray =new JPEGEncoder().encodeByteArray(byteArr,width,height);
var fileRefer:FileReference = new FileReference();
fileRefer.save(byteArr123,UIDUtil.createUID()+".png");
fileRefer.addEventListener(Event.COMPLETE,function completeHandler():void{
Alert.show("保存本地成功");
});
}
//照片上传到服务器
protected function upLoadImg(imgID:UIComponent):void
{
var width :int = imgID.width;
var height :int = imgID.height;
var bitmapData:BitmapData =new BitmapData(width,height);
bitmapData.draw(imgID);
var byteArr:ByteArray = bitmapData.getPixels(new Rectangle(0,0,width,height));
var byteArr123:ByteArray =new JPEGEncoder().encodeByteArray(byteArr,width,height);
webService.UploadFile(byteArr123,"123.png");
}
protected function webService_faultHandler(event:FaultEvent):void
{
Alert.show(event.fault.toString());
}
protected function webService_successHandler(event:ResultEvent):void
{
Alert.show(event.result.toString());
}
]]>
</fx:Script>
<fx:Declarations>
<!-- 将非可视元素(例如服务、值对象)放在此处 -->
<s:WebService id="webService" wsdl="http://10.19.1.48/upImg/Service1.asmx?WSDL" fault="webService_faultHandler(event)">
<s:operation name="UploadFile" result="webService_successHandler(event)"></s:operation>
</s:WebService>
</fx:Declarations>
<s:VideoDisplay id="videoDis" width="500" height="500" click="UItoBitmap(videoDis,t_img_Picture),UItoBitmap(videoDis,content)" toolTip="点击拍照"></s:VideoDisplay>
<mx:DateChooser id="myDate" x="62" y="508" click="UItoBitmap(myDate,t_img_Picture),UItoBitmap(myDate,content)" toolTip="点击拍照"/>
<mx:Image id="t_img_Picture" x="522" y="0" width="500" height="500" click="UISaveAsImg(t_img_Picture)" toolTip="点击保存本地"/>
<mx:Canvas id="content" x="500" y="300" width="500" height="500" click="UISaveAsImg(content)" toolTip="点击保存本地"></mx:Canvas>
<s:Button x="305" y="537" label="上传" width="130" height="64" click="upLoadImg(t_img_Picture)"/>
</s:Application>
复制代码 代码如下:
/// <summary>
/// 上传文件到远程服务器
/// </summary>
/// <param name="fileBytes">文件流</param>
/// <param name="fileName">文件名</param>
/// <returns>字符串</returns>
[WebMethod(Description = "上传文件到远程服务器.")]
public string UploadFile(byte[] fileBytes, string fileName)
{
try
{
MemoryStream memoryStream = new MemoryStream(fileBytes); //1.定义并实例化一个内存流,以存放提交上来的字节数组。
FileStream fileUpload = new FileStream(Server.MapPath(".") + "" + fileName, FileMode.Create); ///2.定义实际文件对象,保存上载的文件。
memoryStream.WriteTo(fileUpload); ///3.把内存流里的数据写入物理文件
memoryStream.Close();
fileUpload.Close();
fileUpload = null;
memoryStream = null;
return "文件已成功上传至服务器";
}
catch (Exception ex)
{
return ex.Message;
}
}
61阅读| 精彩专题| 最新文章| 热门文章| 苏ICP备13036349号-1