一 : Spotify开放开发工具供iOS应用开发者使用
腾讯科技讯(Kathy)北京时间9月1日消息,据国外媒体报道,音乐服务Spotify开放了它的开发工具,让开发人员可以把Spotify功能集成到各种iOS应用中。现在所有iOS应用都可以使用包含了1500万首歌曲的Spotify音乐库了。
你可以将这想成是“把电台小工具添加到网站上”的移动版本。从今天起,Spotify的高级用户和开发人员都可以开始使用这种名为libspotify的服务。这种新的编码选择将会帮助Spotify在iOS应用生态系统上蔓延开来。

Spotify希望此举可以催生出一批集成了它的音乐服务的新应用。业界人士认为,那将是跨功能应用的一个有趣发展,打比方说,你在使用Twitter应用,新闻阅读器,或游戏应用时,可以不必离开这个应用,就开始在后台播放Spotify。
Libspotify是一个C API(应用编程接口),可用于访问和音乐人、专辑、曲目和播放列表有关的数据。开发人员需要用一个Objective C封套工具来把libspotify集成到应用中并进行API调用。
如果开发人员想把libspotify用于商业用途,他们需要先联系该服务的“合作伙伴计划”部门。对于从各大唱片公司获得授权音乐的Spotify来说,音乐的发布(尤其是以获取金钱为目的的发布)是一个存在风险的问题,因此开发人员必须联系Spotify以确保遵守了它的规则和条例。
二 : iOS开发,Reveal的使用
故事的背景是这样的。
王二最近换了一个新老板,产品团队是新的,测试团队是新的,只有他一个人干着iOS的开发工作,前有老板催促项目,后有测试堵截bug,好苦逼啊。。。本来,特意为产品给的设计图会是这样的

但实际上,产品给的设计图是这样的:

果然,理想很丰满,现实很骨感。苦逼的王二同学跑去问产品:“UI元素之间的尺寸怎么确定?”产品说:“你定吧,看着和原型图一样就行。”呵呵呵呵呵,这种回答和“我要做一张图。”“什么图?”“用户一看就想买的那种图。”有什么区别?
不过这点事情难不倒王二,很快,王二就把ui部分完成了,交给产品一看,产品看了三秒后:“哎,你这个输入框的位置往上3个像素好不好?”“按钮可不可以小几个像素?”。。。。。。王二按照产品的要求修改了下,又拿去给产品看,产品扒拉扒拉说了一堆像素上的事。王二崩溃了,拉着产品在旁边,每改一步,就运行一次程序,给产品看一下效果。就这样,改代码——运行——显示效果——产品扒拉扒拉——改代码——运行——显示效果——产品扒拉扒拉。。。。
王二疯了。。。。。
王二给我讲了他的遭遇后,我问他:你知不知道一个能实时修改ui尺寸并显示的app?
王二:。。。。。。
好吧,我来告诉你。
这个软件就是大名鼎鼎的Reveal,下载地址http://revealapp.com/download/
首先下载试用版的(这个软件建议花钱买一下,物超所值啊有木有),安装。嗯,就是这个样子的

安装完后,就该配置了
1、打开命令窗口,在根目录下创建一个.lldbinit文件。输入下列命令,后回车
vim ~/.lldbinit2、回车后,输入下列代码:
command alias reveal_load_sim expr (void*)dlopen("/Applications/Reveal.app/Contents/SharedSupport/iOS-Libraries/libReveal.dylib", 0x2);command alias reveal_load_dev expr (void*)dlopen([(NSString*)[(NSBundle*)[NSBundle mainBundle] pathForResource:@"libReveal" ofType:@"dylib"] cStringUsingEncoding:0x4], 0x2);command alias reveal_start expr (void)[(NSNotificationCenter*)[NSNotificationCenter defaultCenter] postNotificationName:@"IBARevealRequestStart" object:nil];command alias reveal_stop expr (void)[(NSNotificationCenter*)[NSNotificationCenter defaultCenter] postNotificationName:@"IBARevealRequestStop" object:nil];以上是四句命令,命令的意思是,给lldb设置了4个别名,这四个别名的意义是:reveal_load_sim:模拟器加载reveal时调用的动态链接库
reveal_load_dev:真机加载reveal时调用的动态链接库
reveal_start:启动reveal的调试功能
reveal_stop:关闭reveal的调试功能
在输入完这些命令后,输入以下命令,按一下回车就保存并退出编辑模式了
:wq
3、在工程中配置reveal链接到模拟器
打开工程后,在appdeleget中的didfinished:方法中打下断点,并按下图编辑断点:
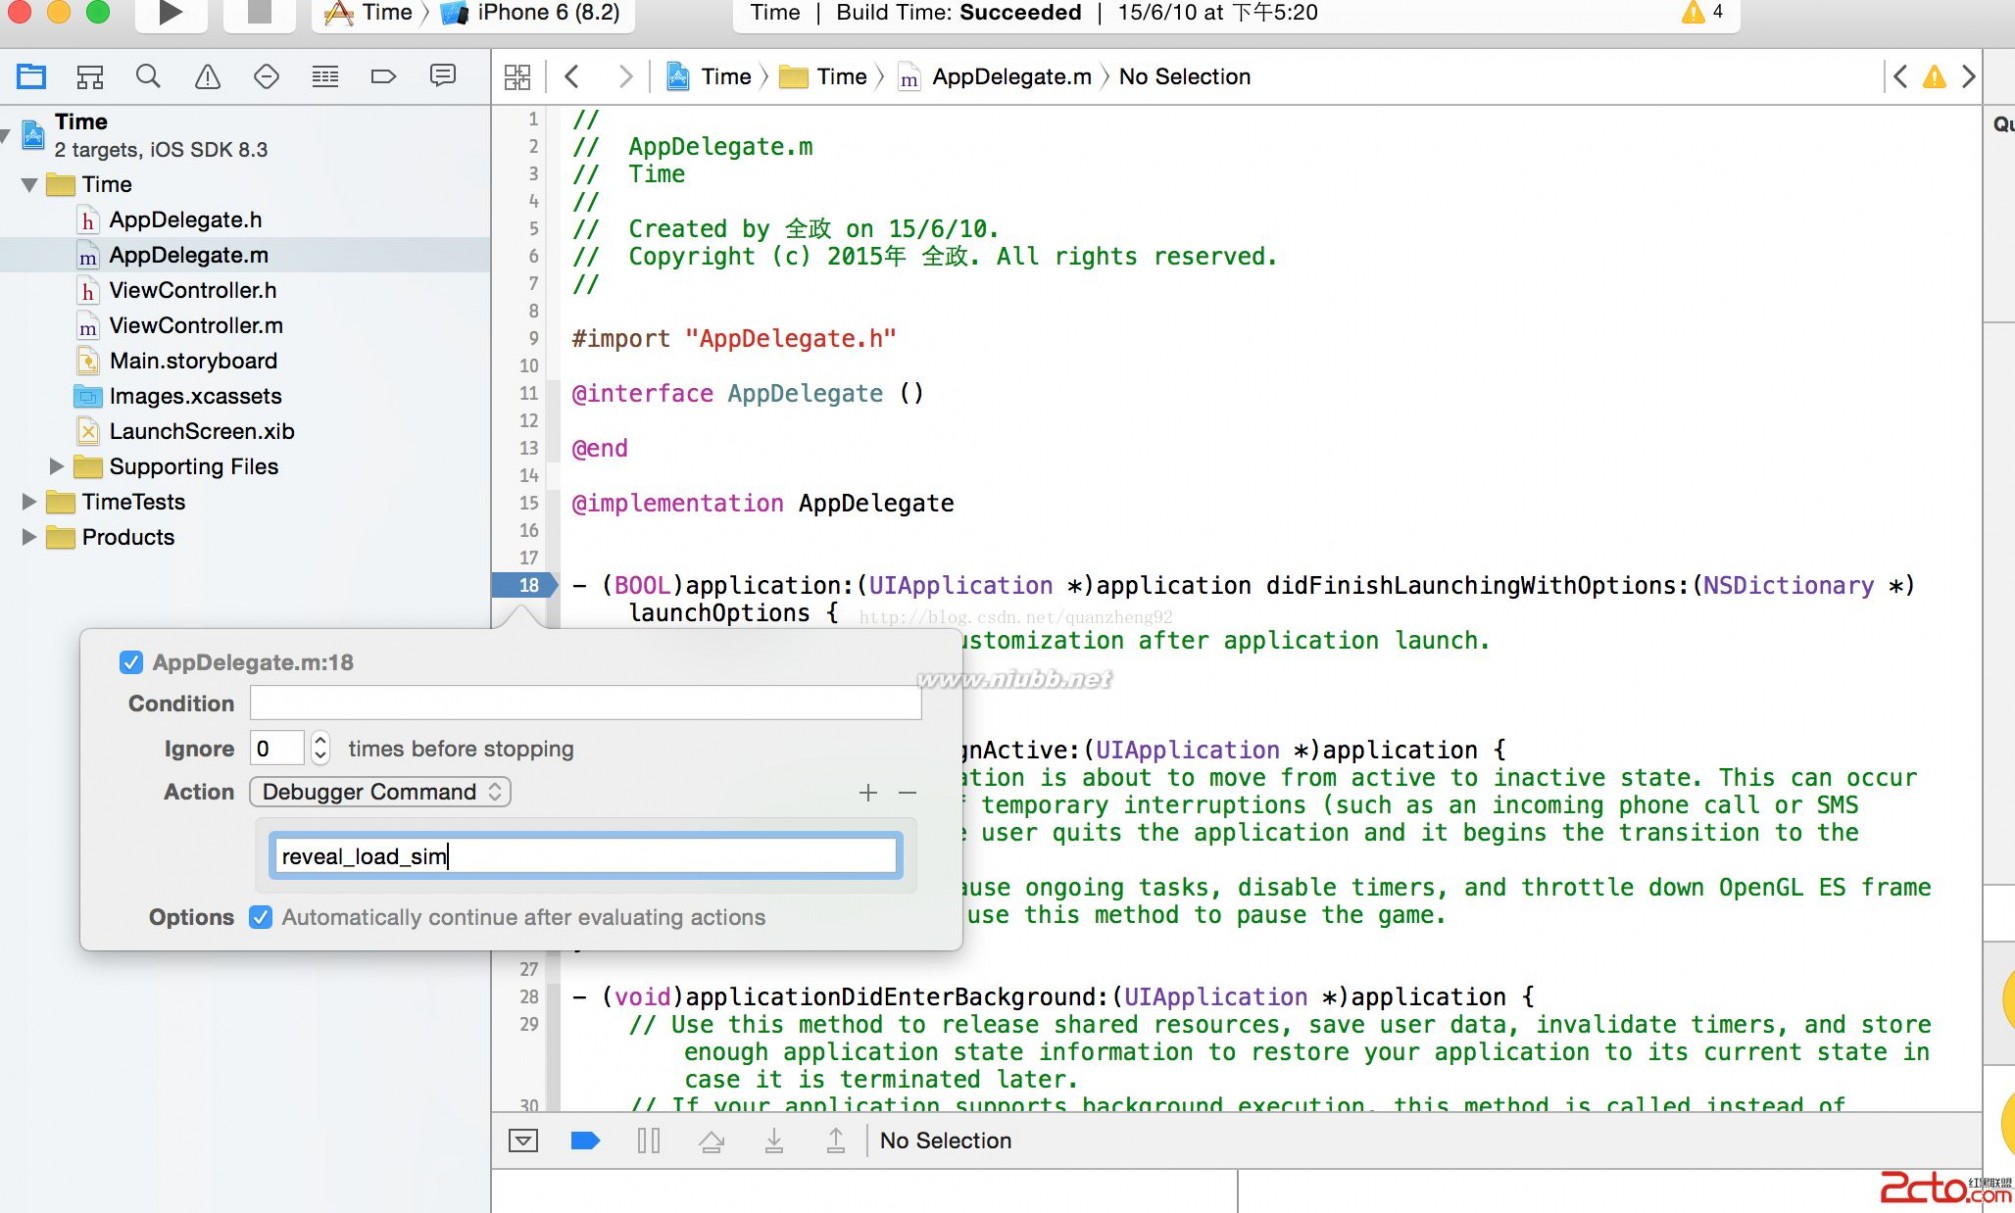
打完断点后,就可以选择模拟器运行工程了,当工程跑起来后,打开reveal,点击左上角的工程选择,会看到我们的工程。如图:
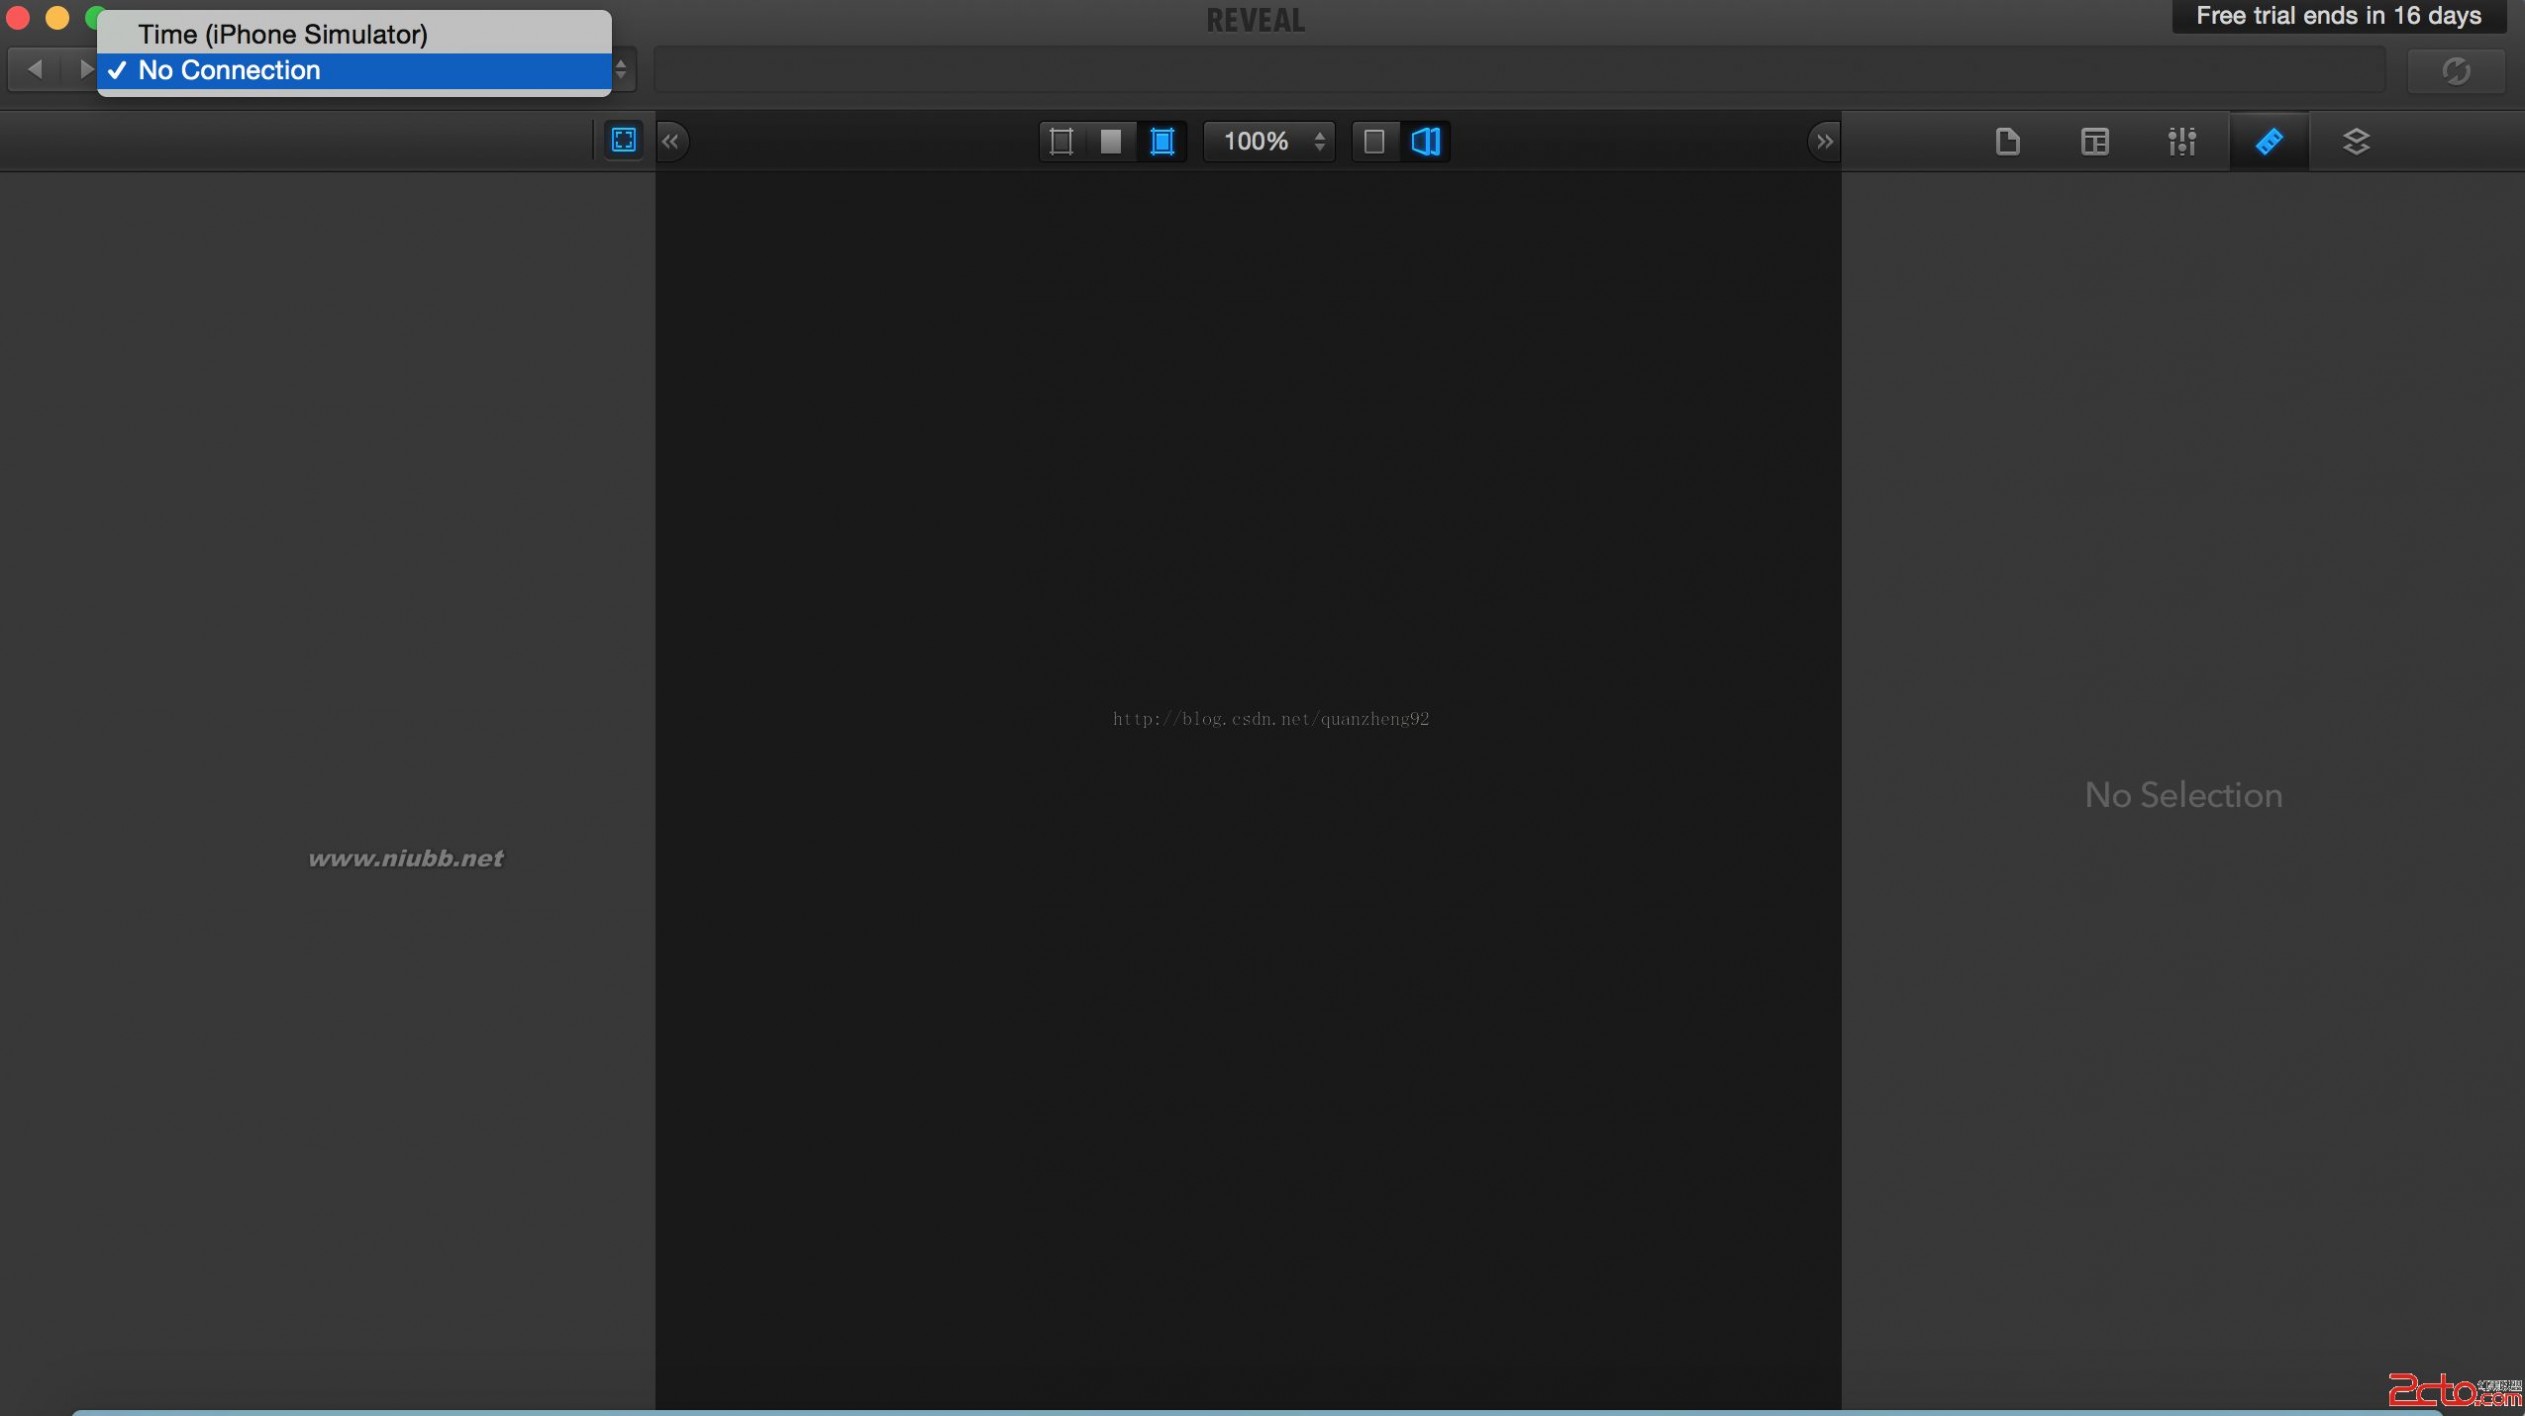
选择我们的app的工程,就能在reveal中看到我们的ui布局了。
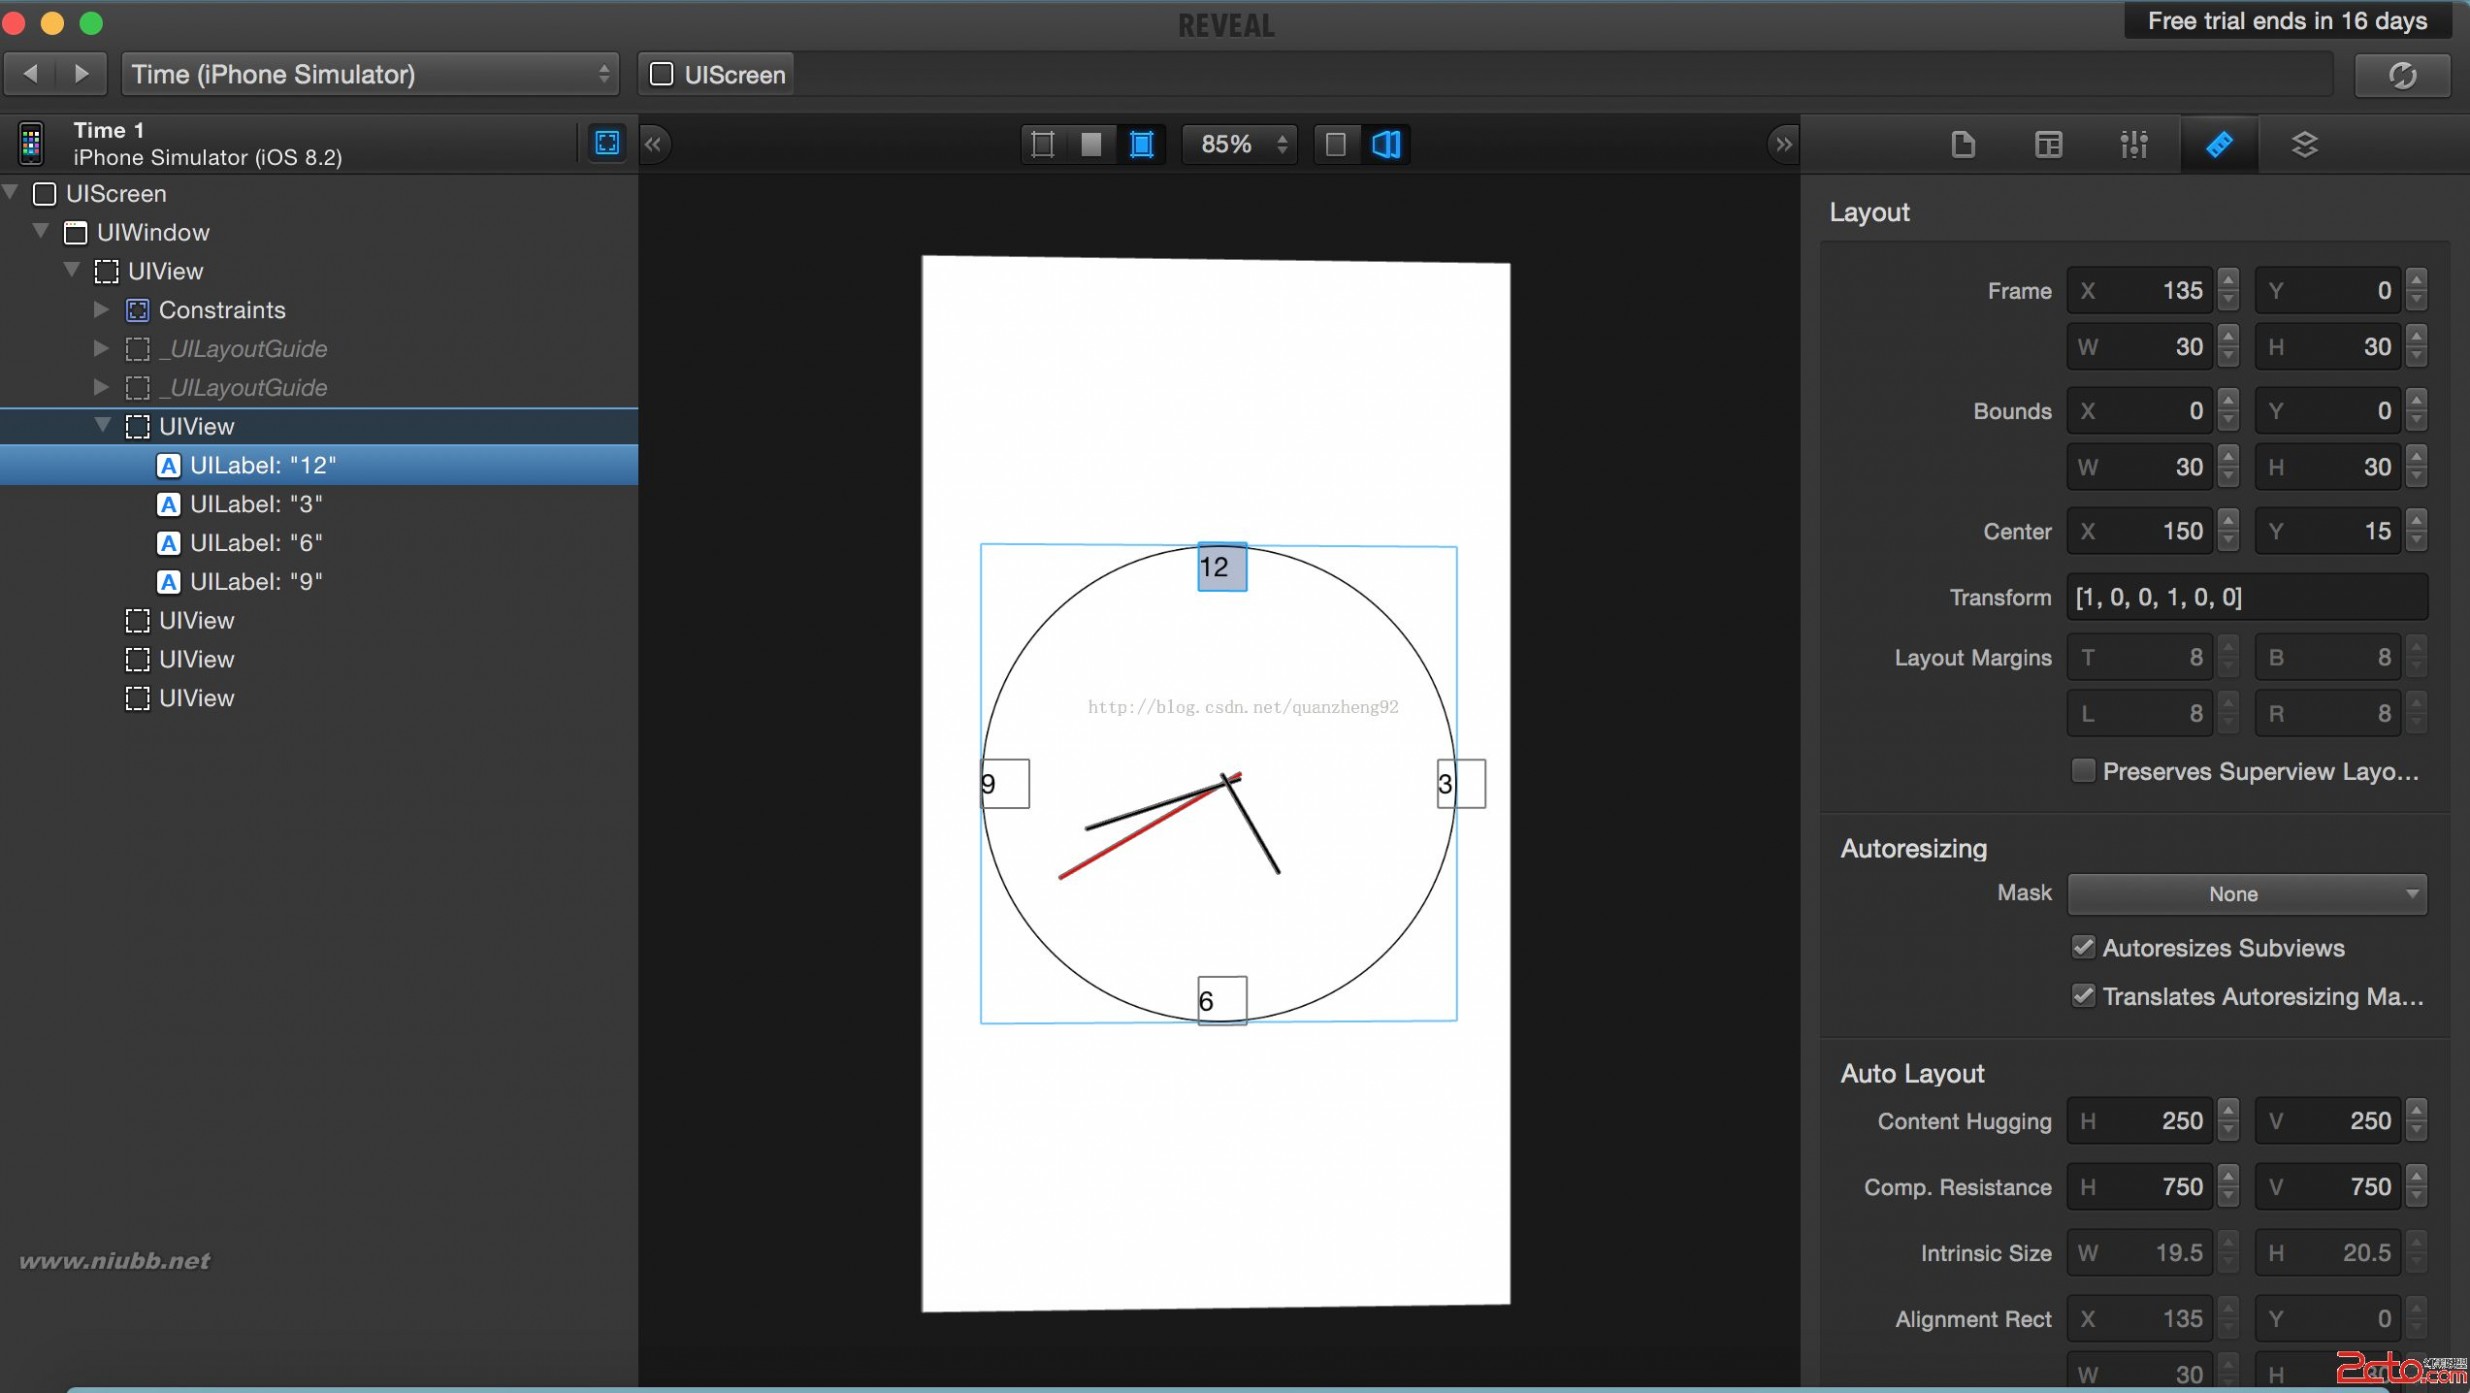
左边是干嘛的我就不说了,中间是当前页面的ui,右边是ui元素的相关尺寸、位置信息。在右边对应的框中可以修改相关数值并即时显示。
在Xcode中也提供了这种即时查看ui的功能,但是没法动态实时修改所以还是用reveal比较方便一点,而且,在修改了某个页面的元素尺寸后,在模拟器上计入下一个页面,回到reveal上之后重新连
reveal还可以在真机调试中链接真机,在编辑断点时要修改为相应的指令。并且将reveal的动态链接库一并添加进工程中:
1、点击revel菜单的“help——》show reveal library in finder”在finder中查找reveal的动态链接库:libReveal.dylib,并将其拖入工程。
2、调整libReveal.dylib的引用方式,这里我们只需要将libReveal.dylib文件拷贝到Sandbox中,但是我们在引入libReveal.dylib的时候Xcode默认是以Link Binary With Libraries的方式的,实际上应该是Copy Bundle Resources,所以应该先将libReveal.dylib从Link Binary With Libraries中移除掉,然后在Copy Bundle Resources中添加。
3、修改断点处的指令为reveal_load_dev.
reveal还可以连接破解版的苹果设备,来查看其他家的appUI结构,这个方法我没有用过,大家可以去找找网上的资料。

三 : IOS 开发常用代码
阴影
UIView *feeView = [[UIView alloc] initWithFrame:CGRectMake(20, 20, 280, 200)];//计费显示
[feeView.layer setBorderWidth: 2.0];
[feeView.layer setCornerRadius:20.0f];
[feeView.layer setMasksToBounds:NO];
[feeView.layer setBorderColor: [[UIColor lightGrayColor] CGColor]];
UIColor * highColor = [UIColor colorWithWhite:1.000 alpha:1.000];
UIColor * lowColor = [UIColor colorWithRed:0.851 green:0.859 blue:0.867 alpha:1.000];
CAGradientLayer * gradient = [CAGradientLayer layer];
[gradient setFrame:[feeView bounds]];
[gradient setColors:[NSArray arrayWithObjects:(id)[highColor CGColor], (id)[lowColor CGColor], nil]];
//the rounded rect, with a corner radius of 6 points.
//this *does* maskToBounds so that any sublayers are masked
//this allows the gradient to appear to have rounded corners
// CALayer * roundRect = [CALayer layer];
// [roundRect setFrame:[feeView bounds]];
// [roundRect setCornerRadius:6.0f];
// [roundRect setMasksToBounds:YES];
// [roundRect addSublayer:gradient];
//
// [feeView.layer insertSublayer:roundRect atIndex:0];
//set the shadow on the view's layer
[feeView.layer setShadowColor:[[UIColor blackColor] CGColor]];
[feeView.layer setShadowOffset:CGSizeMake(0, 0)];
[feeView.layer setShadowOpacity:1.0];
[feeView.layer setShadowRadius:10.0];
[feeView setBackgroundColor:[UIColor whiteColor]];
为视图加边框
[[UIApplication sharedApplication] setStatusBarHidden:YES withAnimation: UIStatusBarAnimationSlide];
UIImageView *contentView = [[MyUIImageView alloc] initWithFrame:[[UIScreen mainScreen] applicationFrame]];
[contentView setImage:[UIImage imageNamed:@"1.jpg"]];
[contentView setUserInteractionEnabled:YES];
self.view=[[UIView alloc] initWithFrame:[[UIScreen mainScreen] applicationFrame]];
[self.view addSubview:contentView];
self.view.backgroundColor=[UIColor blackColor];
/*
CALayer *layer=[contentView layer];
[layer setMasksToBounds:YES];
[layer setCornerRadius:10.0];
[layer setBorderWidth:4.0];
*/
//为视图增加边框
contentView.layer.masksToBounds=YES;
contentView.layer.cornerRadius=20.0;
contentView.layer.borderWidth=10.0;
contentView.layer.borderColor=[[UIColor blueColor] CGColor];
UIImage 图片缩放到指定大小尺寸
2011/03/26 17:43
lazytable 例子
// Set appIcon and clear temporary data/image
UIImage *image = [[UIImage alloc] initWithData:self.activeDownload];
if (image.size.width != kAppIconHeight && image.size.height != kAppIconHeight)
{
CGSize itemSize = CGSizeMake(kAppIconHeight, kAppIconHeight);
UIGraphicsBeginImageContext(itemSize);
CGRect imageRect = CGRectMake(0.0, 0.0, itemSize.width, itemSize.height);
[image drawInRect:imageRect];
self.appRecord.appIcon = UIGraphicsGetIma
geFromCurrentImageContext();
UIGraphicsEndImageContext();
}
else
{
self.appRecord.appIcon = image;
}
self.activeDownload = nil;
[image release];
图片缩放到指定大小尺寸
- (UIImage *)scaleToSize:(UIImage *)img size:(CGSize)size{
// 创建一个bitmap的context
// 并把它设置成为当前正在使用的context
UIGraphicsBeginImageContext(size);
// 绘制改变大小的图片
[img drawInRect:CGRectMake(0, 0, size.width, size.height)];
// 从当前context中创建一个改变大小后的图片
UIImage* scaledImage = UIGraphicsGetImageFromCurrentImageContext();
// 使当前的context出堆栈
UIGraphicsEndImageContext();
// 返回新的改变大小后的图片
return scaledImage;
}
判断设备
if ([[UIDevice currentDevice] userInterfaceIdiom] == UIUserInterfaceIdiomPad) {
NSLog(@"ipad");
}
else
{
NSLog(@"iphone or ipod");
}
判断分辨率
- (void)viewDidLoad
{
[super viewDidLoad];
// Do any additional setup after loading the view from its nib.
UIImage *logo = [UIImage imageNamed:@"icon@2x.png"];
UIScreenMode *sm =[[UIScreen mainScreen] currentMode];
CGSize cs = sm.size;
//可以判断出屏幕分辨率
MCLog(@"%f x %f", cs.width,cs.height);
// CGRect cr = [[UIScreen mainScreen] applicationFrame];
// MCLog(@"%f x %f", cr.size.width,cr.size.height);
CGSize frame = [logo size];
CGRect viewRect = CGRectMake(10, 10, frame.width, frame.height);
//UIView* myView = [[UIView alloc] initWithFrame:viewRect];
[logoImageView setFrame:viewRect];
[logoImageView setImage:logo];
}
iphone CGContextSetLineWidth 画线的问题
CGContextRef context = UIGraphicsGetCurrentContext();
CGContextSetRGBStrokeColor (context, 142.0/ 255.0, 161.0/ 255.0, 189.0/ 255.0, 1.0);
CGContextSetLineWidth(context, 1.0 );//这里设置成了1但画出的线还是2px,给我们的感觉好像最小只能是2px。
CGContextMoveToPoint(context, 1.0 , 24.0 );
CGContextAddLineToPoint(context, 83.0 , 24.0 );
CGContextClosePath(context);
CGContextStrokePath(context);
原因是因为默认情况下,锯齿显示,所以它显示为宽度= 2.0,关闭消除锯齿可以解决问题了。
CGContextSetShouldAntialias(context, NO );
获取上下文
CGContextRef context = UIGraphicsGetCurrentContext();
画一个正方形图形 没有边框
CGContextSetRGBFillColor(context, 0, 0.25, 0, 0.5);
CGContextFillRect(context, CGRectMake(2, 2, 270, 270));
CGContextStrokePath(context);
写文字
CGContextSetLineWidth(context, 1.0);
CGContextSetRGBFillColor (context, 1, 1, 1, 1.0);
UIFont *font = [UIFont boldSystemFontOfSize:11.0];
[@"fangyp" drawInRect:CGRectMake(40, 40, 80, 20) withFont:font];
画一条线
CGContextSetRGBStrokeColor(context, 0.5, 0.5, 0.5, 0.5);//线条颜色
CGContextMoveToPoint(context, 20, 20);
CGContextAddLineToPoint(context, 200,20);
CGContextStroke
Path(context);
画正方形边框
CGContextSetRGBStrokeColor(context, 1, 1.0, 1.0, 1.0);
CGContextSetLineWidth(context, 2.0);
CGContextAddRect(context, CGRectMake(2, 2, 270, 270));
CGContextStrokePath(context);
2.等待线程运行结束后 ,再执行后面的代码。
-(IBAction)start:(id)sender
{
pageStillLoading=燳ES;
[NSThread燿etachNewThreadSelector:@selector(loadPageInBackground:)toTarget:self withObject:nil];
[progress setHidden:NO];
while(pageStillLoading)爗
[NSRunLoop燾urrentRunLoop]爎unMode:NSDefaultRunLoopMode beforeDate:[NSDate燿istantFuture]];
}
[progress setHidden:YES];
}
objective-c获取自1970年以来的毫秒数
NSTimeInterval time=[[NSDate date] timeIntervalSince1970]*1000;
double i=time; //NSTimeInterval返回的是double类型
NSLog(@"1970timeInterval:%f",i);
java获取自1970年以来的毫秒数
long startPaintLogoTime=System.currentTimeMillis();
- (float) os_time
{
NSDateFormatter *formatter = [[NSDateFormatter alloc] init];
[formatter setDateFormat:@"MM-dd-hh-mm-ss-HHMM"];
NSString*locationString=[formatter stringFromDate: [NSDate date]];
NSArray*timeArray=[locationString componentsSeparatedByString:@"-"];
float value_D= [[timeArray objectAtIndex:1]floatValue];
float value_h= [ [timeArray objectAtIndex:2]floatValue];
float value_m= [ [timeArray objectAtIndex:3]floatValue];
float value_s= [ [timeArray objectAtIndex:4]floatValue];
//时区偏移量。
float value_f= [ [timeArray objectAtIndex:5]floatValue];
float value_All=value_D*24*60*60+value_h*60*60+value_m*60+value_s;
[formatter release];
return value_All;
}
保存图片
(void)saveImageToPhone
{
UIImageWriteToSavedPhotosAlbum(img,nil, nil, nil);
UIAlertView *alert = [[UIAlertView alloc] initWithTitle:nil
message:@"您已将照片存储于图片库中,打开照片程序即可查看。"
delegate:self
cancelButtonTitle:@"OK"
otherButtonTitles:nil];
[alert show];
[alert release];
}
#import <QuartzCore/QuartzCore.h>
-(void)saveCurrentScreenToPhone
{
UIGraphicsBeginImageContext(self.view.bounds.size);
[self.view.layer renderInContext:UIGraphicsGetCurrentContext()];
UIImage*viewImage = UIGraphicsGetImageFromCurrentImageContext();
UIGraphicsEndImageContext();
UIImageWriteToSavedPhotosAlbum(viewImage,nil, nil, nil);
UIAlertView *alert = [[UIAlertView alloc] initWithTitle:nil
message:@"您已将当前屏幕截图存储在图片库中,打开照片程序即可查看。"
delegate:self
cancelButtonTitle:@"OK"
otherButtonTitles:nil];
[a
lert show];
[alert release];
}
添加一个按钮
//create a Button view
//创建一个按钮,这个按钮接收事件slideShow
CGRect frame=CGRectMake(10,70,300,50);
UIButton *button=[UIButton buttonWithType:UIButtonTypeRoundedRect];
button.frame=frame;
[button setTitle:@"Click Me,please!" forState:UIControlStateNormal];
button.backgroundColor=[UIColor clearColor];
button.tag=2000;
[button addTarget:self action:@selector(slideShow:)
forControlEvents:UIControlEventTouchUpInside];
[window addSubview:button];
[self.window makeKeyAndVisible];
//////////////////////////////////////////////////////
Iphone 开发常用代码
#pragma mark -
#pragma mark 重写父类方法,UIResponder中方法。
- (void)touchesEnded:(NSSet *)touches withEvent:(UIEvent *)event{
NSUInteger touchCount = [touches count];
if (touchCount == 1)
{
UITouch* touch = [[touches allObjects] objectAtIndex:0];
CGPoint touchPoint = [touch locationInView: self.view];
}
}
取鼠标点击屏幕区域的坐标。
- (void)touchesEnded:(NSSet *)touches withEvent:(UIEvent *)event
{
NSUInteger touchCount = [touches count];
if (touchCount == 1)
{
UITouch* touch = [[touches allObjects] objectAtIndex:0];
CGPoint touchPoint = [touch locationInView: self.view];
}
}
1、在地图中添加一个手势,这个手势是一个点击动作,点击时会调用tapPress这个方法
UITapGestureRecognizer *mTap = [[UITapGestureRecognizer alloc] initWithTarget:self action:@selector(tapPress:)];
[myMapView addGestureRecognizer:mTap];
[mTap release];
2、接下来就可以在tapPress这个方法中进行转换了
- (void)tapPress:(UIGestureRecognizer*)gestureRecognizer {
CGPoint touchPoint = [gestureRecognizer locationInView:myMapView];//这里touchPoint是点击的某点在地图控件中的位置
CLLocationCoordinate2D touchMapCoordinate =
[myMapView convertPoint:touchPoint toCoordinateFromView:myMapView];//这里touchMapCoordinate就是该点的经纬度了
}
//坐标转换
CGPoint touchPoint = [gestureRecognizer locationInView:m_mapView];
CLLocationCoordinate2D touchMapCoordinate =
[m_mapView convertPoint:touchPoint toCoordinateFromView:m_mapView];
//annotationView图片。
// annotationView.image = [UIImage imageNamed:@"history.png"];
//根据随机函数,生成annotation.
// NSMutableArray *marray = [NSMutableArray arrayWithCapacity:50];
// for (int i =0; i<=50; i++ ) {
// float lat = [CommonUtils randomValueBetween:37.0 andValue:37.35];
// float longi = [CommonUtils randomValueBetween:-122.3 andValue:-121.5];
// CLLocationCoordinate2D tmpcoordinate = {lat, longi};
// MCUserAnnotation* markera = [[MCUserAnnotation alloc] initWithCoordinate:tmpcoordinate];
// markera._name = @"vvv";
//
// //[mapView addAnnotation:marker];
// // [mapView addAnnotation:markera];
// [marray insertObject:markera atIndex:i];
// [markera release];
//
//
// }
// [mapView addAnnotations:marray];
添加一个按钮在nav bar上面。
// UIBarButtonItem *cancelButton = [[UIBarButtonItem alloc]
// initWithTitle:@"Cancel"
// style:UIBarButtonItemStylePlain
// target:self
// action:@selector(cancel:)];
// self.navBar.leftBarButtonItem = cancelButton;
// [cancelButton release];
获取坐标;
// CLLocationCoordinate2D coordinate = [[mapView userLocation] coordinate];
// CLLocationCoordinate2D mapCenter = mapView.centerCoordinate;
将点转换为坐标。经纬度
// mapCenter = [mapView convertPoint:
// CGPointMake(1, (mapView.frame.size.height/2.0))
// toCoordinateFromView:mapView];
使用MKMapView时,点击iPhone屏幕,大头针落在触点的代码
- (MKAnnotationView *)mapView:(MKMapView *)mV viewForAnnotation:(id <MKAnnotation>)annotation
{
MKPinAnnotationView *pinView = nil;
if(annotation != mapView.userLocation)
{
static NSString *defaultPinID = @”目的地”;
pinView = (MKPinAnnotationView *)[mapView dequeueReusableAnnotationViewWithIdentifier:defaultPinID];
if ( pinView == nil )
pinView = [[[MKPinAnnotationView alloc] initWithAnnotation:annotation reuseIdentifier:defaultPinID] autorelease];
pinView.pinColor = MKPinAnnotationColorPurple;
pinView.canShowCallout = YES;
pinView.animatesDrop = YES;
pinView.draggable=YES;
pinView.selected=YES;
}
else
{
[mapView.userLocation setTitle:@"I am here"];
}
return pinView;
}
segmentContro选择地图。
-(IBAction)switchControl:(id)sender{
switch (((UISegmentedControl *)sender).selectedSegmentIndex)
{
case 0: {
mapView.mapType = MKMapTypeStandard;
break;
}
case 1: {
mapView.mapType = MKMapTypeSatellite;
break;
} default:
{
mapView.mapType = MKMapTypeHybrid;
break; }
}
}
自定义按钮
prevButtonItem = [[UIBarButtonItem alloc] initWithTitle:@"上一项" style:UIBarButtonItemStyleBordered target:self action:@selector(ShowPrevious)];
view = [[UIToolbar alloc] initWithFrame:CGRectMake(0,480,320,44)];
view.barStyle = UIBarStyleBlackTranslucent;
view.items = [NSArray arrayWithObjects:prevButtonItem,nextButtonItem,spaceButtonItem,hiddenButtonItem,nil];
更改cell选中的背景
UIView *myview = [[UIView alloc] init];
myview.frame = CGRectMake(0, 0, 320, 47);
myview.backgroundColor = [UIColor colorWithPatternImage:[UIImage imageNamed:@"0006.png"]];
cell.selectedBackgroundView = myview;
在数字键盘上添加button:
//定义一个消息中心
[[NSNotificationCenter defaultCenter] addObserver:self selector:@selecto
r(keyboardWillShow:) name:UIKeyboardWillShowNotification object:nil]; //addObserver:注册一个观察员 name:消息名称
- (void)keyboardWillShow:(NSNotification *)note {
// create custom button
UIButton *doneButton = [UIButton buttonWithType:UIButtonTypeCustom];
doneButton.frame = CGRectMake(0, 163, 106, 53);
[doneButton setImage:[UIImage imageNamed:@"5.png"] forState:UIControlStateNormal];
[doneButton addTarget:self action:@selector(addRadixPoint) forControlEvents:UIControlEventTouchUpInside];
// locate keyboard view
UIWindow* tempWindow = [[[UIApplication sharedApplication] windows] objectAtIndex:1];//返回应用程序window
UIView* keyboard;
for(int i=0; i<[tempWindow.subviews count]; i++) //遍历window上的所有subview
{
keyboard = [tempWindow.subviews objectAtIndex:i];
// keyboard view found; add the custom button to it
if([[keyboard description] hasPrefix:@"<UIKeyboard"] == YES)
[keyboard addSubview:doneButton];
}
}
正则表达式使用:
被用于正则表达式的字串必须是可变长的,不然会出问题
将一个空间放在视图之上
[scrollView insertSubview:searchButton aboveSubview:scrollView];
从本地加载图片
NSString *boundle = [[NSBundle mainBundle] resourcePath];
[web1 loadHTMLString:[NSString stringWithFormat:@"<img src='0001.png'/>"] baseURL:[NSURL fileURLWithPath:boundle]];
从网页加载图片并让图片在规定长宽中缩小
[cell.img loadHTMLString:[NSString stringWithFormat:@"<html><body><img src='%@' height='90px' width='90px'></body></html>",goodsInfo.GoodsImg] baseURL:nil];
将网页加载到webview上通过javascript获取里面的数据,如果只是发送了一个连接请求获取到源码以后可以用正则表达式进行获取数据
NSString *javaScript1 = @"document.getElementsByName('.u').item(0).value";
NSString *javaScript2 = @"document.getElementsByName('.challenge').item(0).value";
NSString *strResult1 = [NSString stringWithString:[theWebView stringByEvaluatingJavaScriptFromString:javaScript1]];
NSString *strResult2 = [NSString stringWithString:[theWebView stringByEvaluatingJavaScriptFromString:javaScript2]];
用NSString怎么把UTF8转换成unicode
utf8Str //
NSString *unicodeStr = [NSString stringWithCString:[utf8Str UTF8String] encoding:NSUnicodeStringEncoding];
View自己调用自己的方法:
[self performSelector:@selector(loginToNext) withObject:nil afterDelay:2];//黄色段为方法名,和延迟几秒执行.
显示图像:
CGRect myImageRect = CGRectMake(0.0f, 0.0f, 320.0f, 109.0f);
UIImageView *myImage = [[UIImageView alloc] initWithFrame:myImageRect];
[myImage setImage:[UIImage imageNamed:@"myImage.png"]];
myImage.opaque = YES; //opaque是否透明
[self.view addSubview:myImage];
[myImage release];
WebView:
CGRect webFrame = CGRectMake(0.0, 0.0, 320.0, 460.0);
UIWebView *webView = [[UIWebView alloc] initWithFrame:webFrame];
[w
ebView setBackgroundColor:[UIColor whiteColor]];
NSString *urlAddress = @"http://www.61k.com;
NSURL *url = [NSURL URLWithString:urlAddress];
NSURLRequest *requestObj = [NSURLRequest requestWithURL:url];
[webView loadRequest:requestObj];
[self addSubview:webView];
[webView release];
显示网络活动状态指示符
这是在iPhone左上部的状态栏显示的转动的图标指示有背景发生网络的活动。
UIApplication* app = [UIApplication sharedApplication];
app.networkActivityIndicatorVisible = YES;
动画:一个接一个地显示一系列的图象
NSArray *myImages = [NSArray arrayWithObjects: [UIImage imageNamed:@"myImage1.png"], [UIImage imageNamed:@"myImage2.png"], [UIImage imageNamed:@"myImage3.png"], [UIImage imageNamed:@"myImage4.gif"], nil];
UIImageView *myAnimatedView = [UIImageView alloc];
[myAnimatedView initWithFrame:[self bounds]];
myAnimatedView.animationImages = myImages; //animationImages属性返回一个存放动画图片的数组
myAnimatedView.animationDuration = 0.25; //浏览整个图片一次所用的时间
myAnimatedView.animationRepeatCount = 0; // 0 = loops forever 动画重复次数
[myAnimatedView startAnimating];
[self addSubview:myAnimatedView];
[myAnimatedView release];
动画:显示了something在屏幕上移动。注:这种类型的动画是“开始后不处理” -你不能获取任何有关物体在动画中的信息(如当前的位置) 。如果您需要此信息,您会手动使用定时器去调整动画的X和Y坐标
这个需要导入QuartzCore.framework
CABasicAnimation *theAnimation;
theAnimation=[CABasicAnimation animationWithKeyPath:@"transform.translation.x"];
//Creates and returns an CAPropertyAnimation instance for the specified key path.
//parameter:the key path of the property to be animated
theAnimation.duration=1;
theAnimation.repeatCount=2;
theAnimation.autoreverses=YES;
theAnimation.fromValue=[NSNumber numberWithFloat:0];
theAnimation.toValue=[NSNumber numberWithFloat:-60];
[view.layer addAnimation:theAnimation forKey:@"animateLayer"];
Draggable items//拖动项目
Here's how to create a simple draggable image.//这是如何生成一个简单的拖动图象
1. Create a new class that inherits from UIImageView
@interface myDraggableImage : UIImageView { }
2. In the implementation for this new class, add the 2 methods:
- (void) touchesBegan:(NSSet*)touches withEvent:(UIEvent*)event
{
// Retrieve the touch point 检索接触点
CGPoint pt = [[touches anyObject] locationInView:self];
startLocation = pt;
[[self superview] bringSubviewToFront:self];
}
- (void) touchesMoved:(NSSet*)touches withEvent:(UIEvent*)event
{
// Move relative to the original touch point 相对以前的触摸点进行移动
CGPoint pt = [[touches anyObject] locationInView:self];
CGRect frame = [self frame];
frame.origin.x += pt.x - startLocation.x;
frame.origin.y += pt.y - startLocation.y;
[self setFrame:frame];
}
3. Now instantiate the new class a
s you would any other new image and add it to your view
//实例这个新的类,放到你需要新的图片放到你的视图上
dragger = [[myDraggableImage alloc] initWithFrame:myDragRect];
[dragger setImage:[UIImage imageNamed:@"myImage.png"]];
[dragger setUserInteractionEnabled:YES];
线程:
1. Create the new thread:
[NSThread detachNewThreadSelector:@selector(myMethod) toTarget:self withObject:nil];
2. Create the method that is called by the new thread:
- (void)myMethod
{
NSAutoreleasePool *pool = [[NSAutoreleasePool alloc] init];
*** code that should be run in the new thread goes here ***
[pool release];
}
//What if you need to do something to the main thread from inside your new thread (for example, show a loading //symbol)? Use performSelectorOnMainThread.
[self performSelectorOnMainThread:@selector(myMethod) withObject:nil waitUntilDone:false];
Plist files
Application-specific plist files can be stored in the Resources folder of the app bundle. When the app first launches, it should check if there is an existing plist in the user's Documents folder, and if not it should copy the plist from the app bundle.
// Look in Documents for an existing plist file
NSArray *paths = NSSearchPathForDirectoriesInDomains( NSDocumentDirectory, NSUserDomainMask, YES);
NSString *documentsDirectory = [paths objectAtIndex:0];
myPlistPath = [documentsDirectory stringByAppendingPathComponent:
[NSString stringWithFormat: @"%@.plist", plistName] ];
[myPlistPath retain];
// If it's not there, copy it from the bundle
NSFileManager *fileManger = [NSFileManager defaultManager];
if ( ![fileManger fileExistsAtPath:myPlistPath] )
{
NSString *pathToSettingsInBundle = [[NSBundle mainBundle] pathForResource:plistName ofType:@"plist"];
}
//Now read the plist file from Documents
NSArray *paths = NSSearchPathForDirectoriesInDomains( NSDocumentDirectory, NSUserDomainMask, YES);
NSString *documentsDirectoryPath = [paths objectAtIndex:0];
NSString *path = [documentsDirectoryPath stringByAppendingPathComponent:@"myApp.plist"];
NSMutableDictionary *plist = [NSDictionary dictionaryWithContentsOfFile: path];
//Now read and set key/values
myKey = (int)[[plist valueForKey:@"myKey"] intValue];
myKey2 = (bool)[[plist valueForKey:@"myKey2"] boolValue];
[plist setValue:myKey forKey:@"myKey"];
[plist writeToFile:path atomically:YES];
Alerts
Show a simple alert with OK button.
UIAlertView *alert = [[UIAlertView alloc] initWithTitle:nil message:
@"An Alert!" delegate:self cancelButtonTitle:@"OK" otherButtonTitles:nil];
[alert show];
[alert release];
Info button
Increase the touchable area on the Info button, so it's easier to press.
CGRect newInfoButtonRect = CGRectMake(infoButton.frame.origin.x-25, infoButton.frame.origin.y-25, infoButton.frame.size.width+50, infoButton.frame.size.height+50);
[infoButton setFrame:newInfoButtonRect];
Detecting Subviews//子视图
You can loop through subviews of an existing view. This works especi
ally well if you use the "tag" property on your views.
for (UIImageView *anImage in [self.view subviews])
{
if (anImage.tag == 1)
{ // do something }
}
四 : iOS开发,用UIColor创建UIImage
iOS开发,用UIColor创建UIImage
+(UIImage *)imageWithColor:(UIColor *)color size:(CGSize)size {
@autoreleasepool {
CGRect rect = CGRectMake(0, 0, size.width, size.height); UIGraphicsBeginImageContext(rect.size);
CGContextRef context = UIGraphicsGetCurrentContext(); CGContextSetFillColorWithColor(context, color.CGColor); CGContextFillRect(context, rect);
UIImage *img = UIGraphicsGetImageFromCurrentImageContext();
UIGraphicsEndImageContext();
return img;
}
}
本文标题:ios开发常用工具-Spotify开放开发工具供iOS应用开发者使用 61阅读| 精彩专题| 最新文章| 热门文章| 苏ICP备13036349号-1