一 : Ubuntu 16.04 Server Edition 英文版安装教程
Ubuntu Server 16.04, also named Xenial Xerus, has been released by Canonical and it’s now ready for installation.
The details about this new LTS version can be found on the previous article: How to upgrade Ubuntu 15.10 to 16.04.
This topic will guide you on how you can install Ubuntu 16.04 Server Edition with Long Time Support on your machine.
If you’re looking for Desktop Edition, read our previous article: Installation of Ubuntu 16.04 Desktop
RequirementsUbuntu 16.04 Server ISO ImageInstall Ubuntu 16.04 Server Edition1. On the first step visit the above link and download the latest version of Ubuntu Server ISO image on your computer.
Once the image download completes, burn it to a CD or create a bootable USB disk using Unbootin (for BIOS machines) or Rufus (for UEFI machines).
2. Place the bootable media intro the appropriate drive, start-up the machine and instruct the BIOS/UEFI by pressing a special function key (F2, F11, F12) to boot-up from the inserted USB/CD drive.
In a few seconds you will be presented with the first screen of Ubuntu installer. Select your language to perform the installation and hit Enter key to move to the next screen.
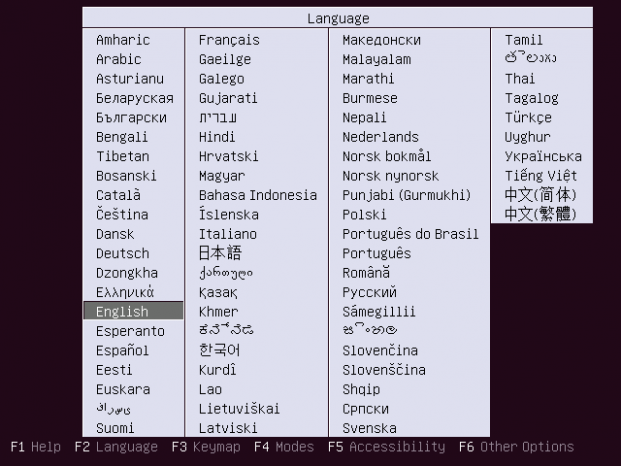
Choose Ubuntu 16.04 Server Installation Language
3. Next, select the first option, Install Ubuntu Server and press Enter key to continue.
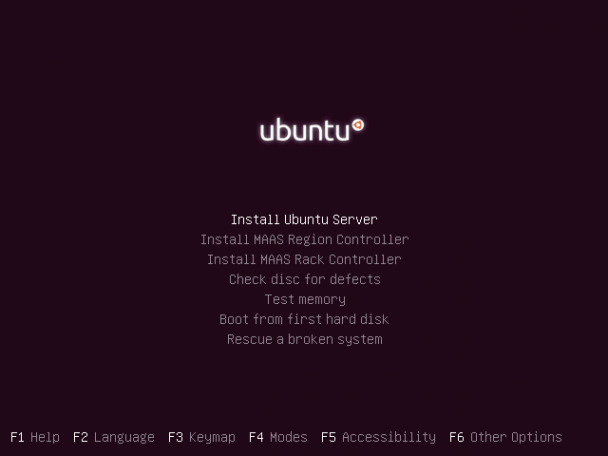
Install Ubuntu 16.04 Server
4. Select the language you with to install the system and press Enter again to continue further.

Select Language for Ubuntu 16.04 Server
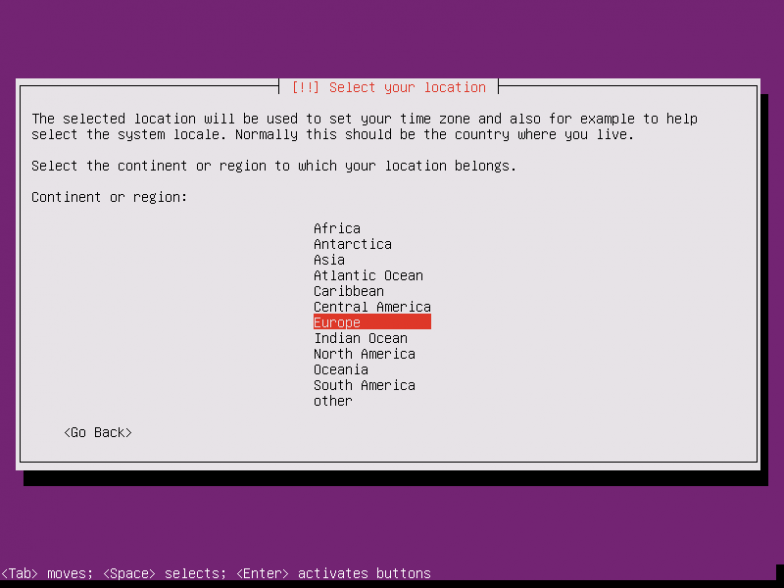
5. On the next series of screen choose your physical location from the presented list. If your location is different than the ones offered on the first screen, select other and hit Enter key, then select the location based on your continent and country. This location will be also used by the timezone system variable. Use the below screenshots as a guide.
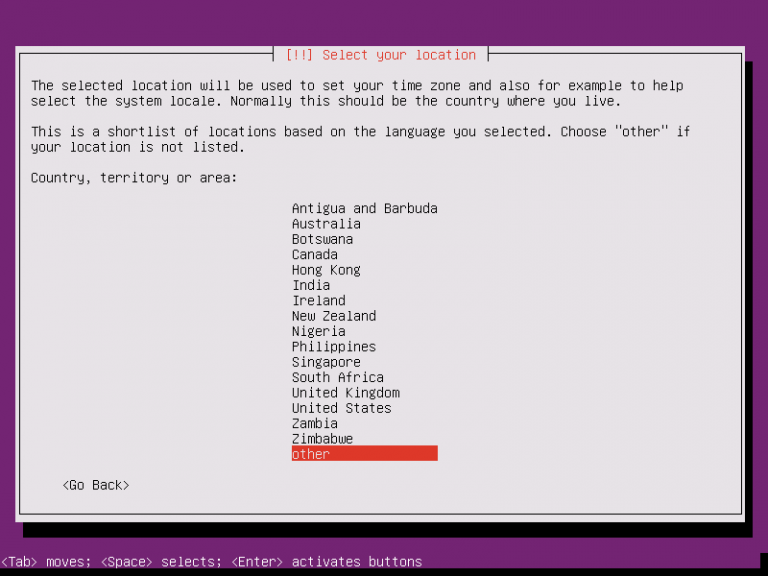
Choose Location for Ubuntu 16.04 Server
Select Country Region
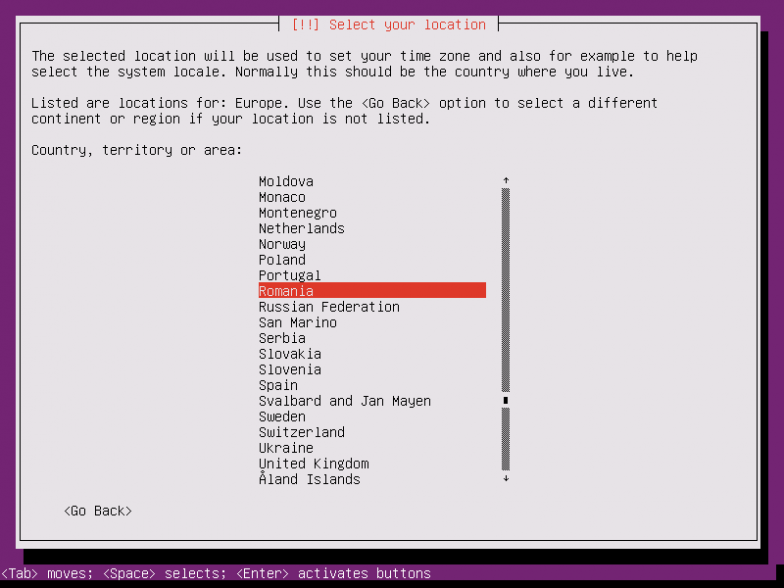
Select Area Location
6. Assign the locales and keyboard settings for your system as illustrated below and hit Enter to continue the installation setup.
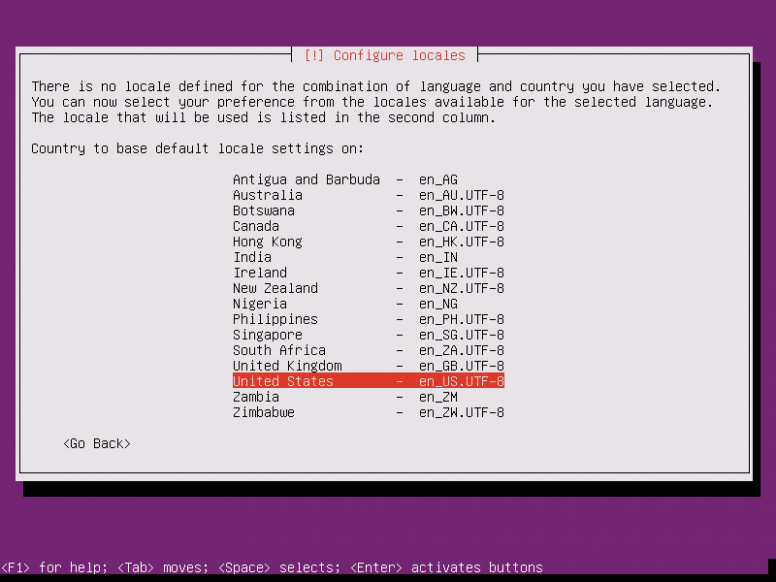
Configure Locales
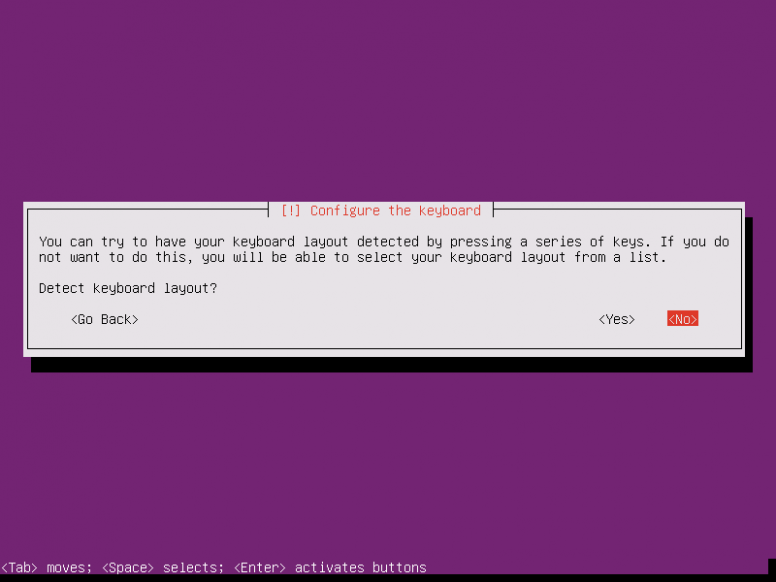
Configure Keyboard Layout
7. The installer will load a series of additional components required for the next steps and will automatically configure your network settings in case you have a DHCP server on the LAN.
Because this installation is intended for a server it’s a good idea to setup a static IP address for your network interface.
To do this you can interrupt the automatic network configuration process by pressing on Cancel or once the installer reaches hostname phase you can hit on Go Back and choose to Configure network manually.
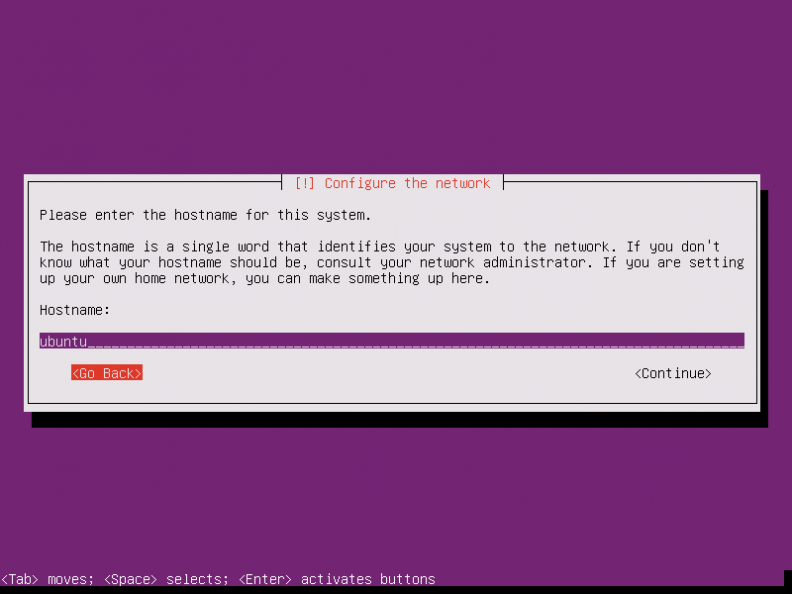
Set Ubuntu 16.04 Hostname
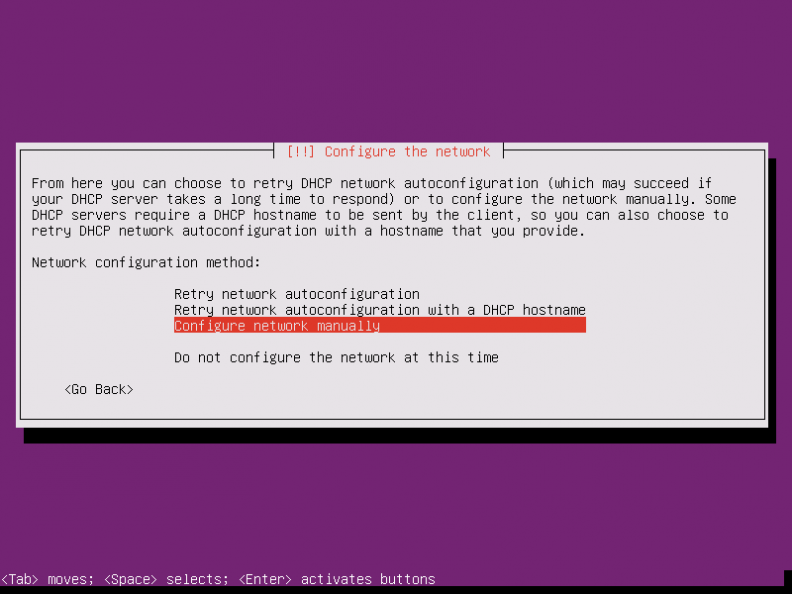
Configure Network Manually
8. Enter your network settings accordingly (IP Address, netmask, gateway and at least two DNS nameservers) as illustrated on the below images.
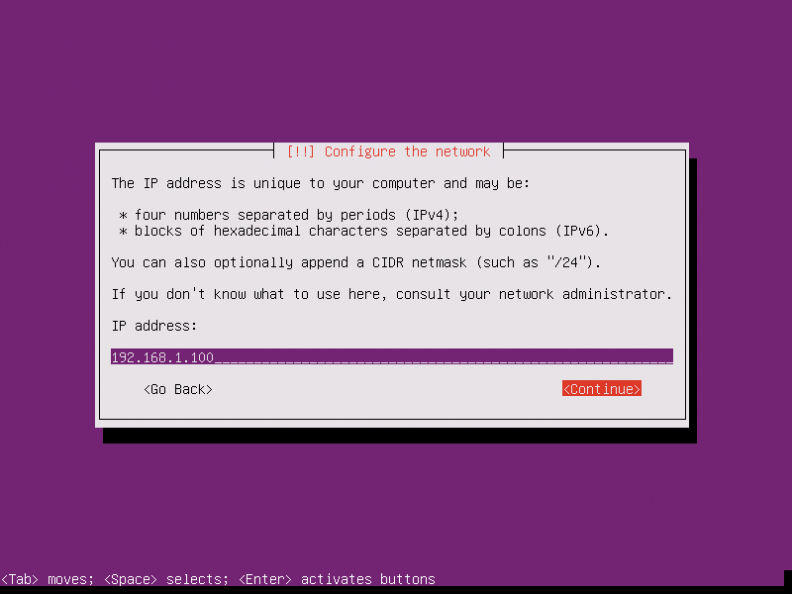
Set Static IP Address on Ubuntu 16.04
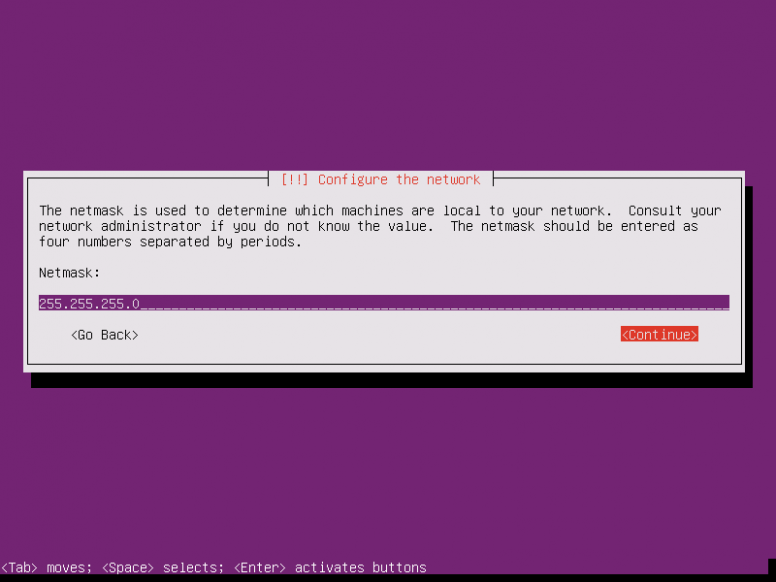
Configure Network Mask for Ubuntu 16.04
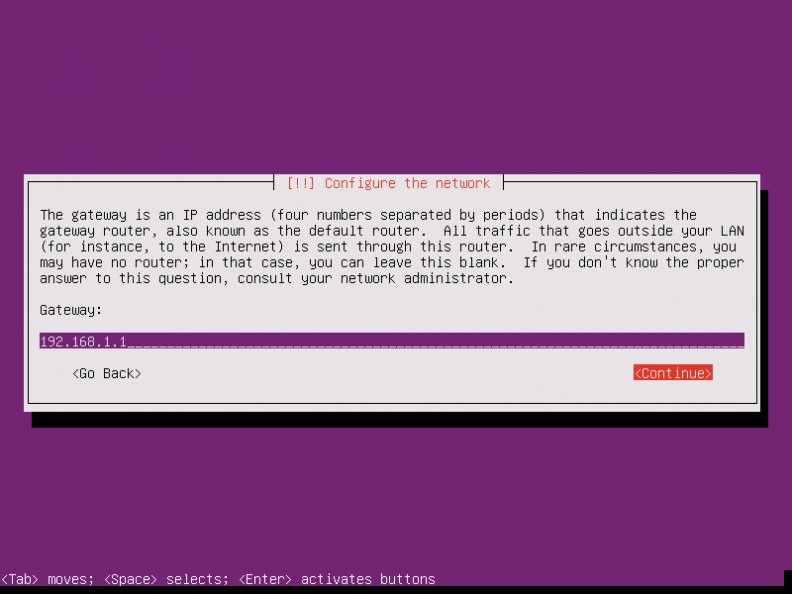
Configure Network Gateway for Ubuntu 16.04

Configure Network DNS on Ubuntu 16.04
9. On the next step setup a descriptive hostname for your machine and a domain (not necessary required) and hit on Continue to move to the next screen. This step concludes the network settings.
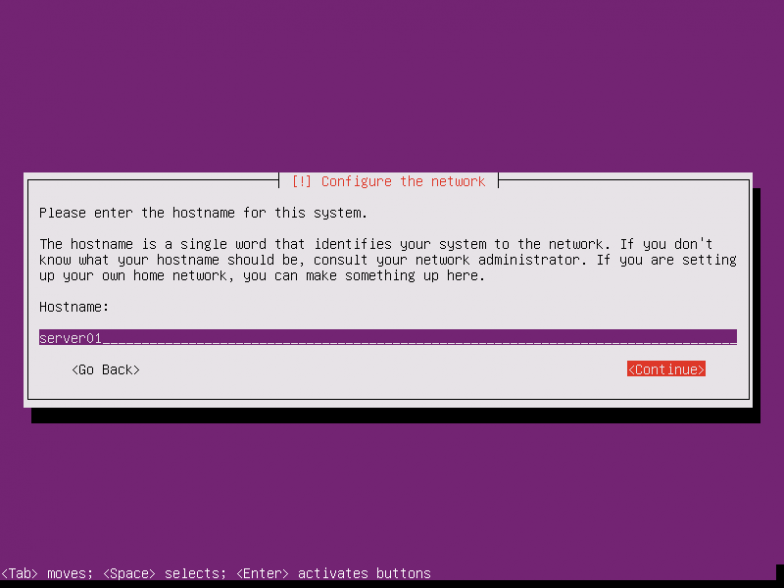
Set Ubuntu 16.04 Server Hostname

Set Ubuntu 16.04 Domain Name
10. On this step the installer prompts you to setup a username and a password for your system. This username will be granted by the system with sudo powers, so, technically, this user will be the supreme administrator next to root account (which is disabled by default).
Thus, choose an inspired username, maybe hard to guess for security reasons, with a strong password and hit on Continue. Choose not to encrypt your home directory and press Enter to continue further.
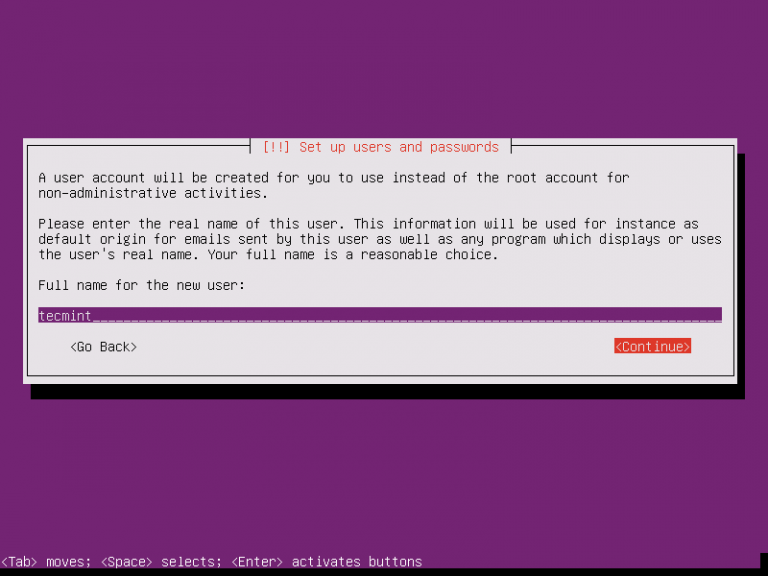
Setup User and Password
11. Next, the installer will automatically set your clock based on the physical location configured earlier. In case the location is correctly chosen hit on Yes to continue to disk partition layout.
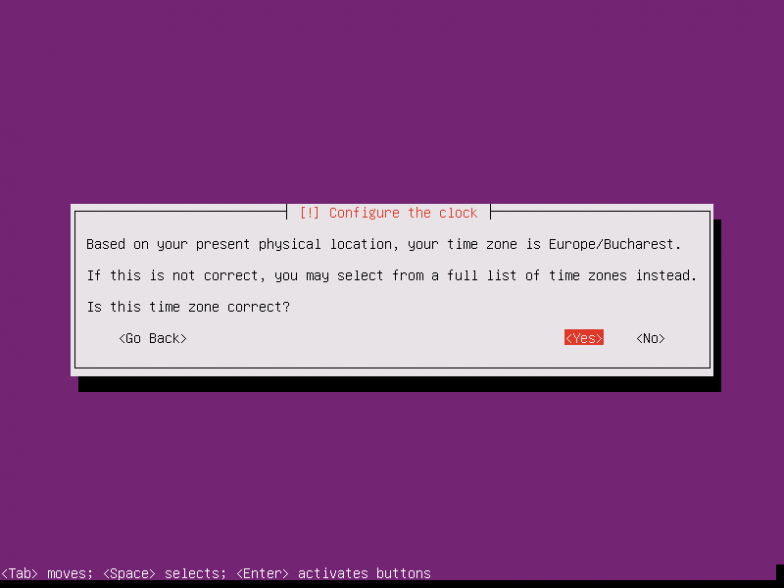
Configure System Clock
12. On the next step you can choose the method that will be used to slice up your disk. For instance, if you need to create custom partition scheme (such as /home, /var, /boot etc) choose Manual method.
For a general purpose server you can stick to Guided with LVM method as illustrated below, which automatically creates the partitions on your behalf.
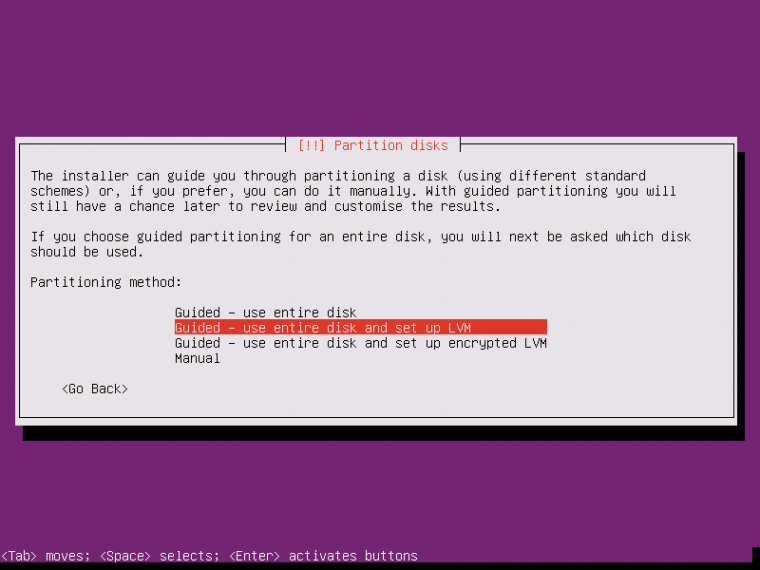
Select Partition Method
13. Next, select the disk that will be used by the installer to create partitions and press Enter key.
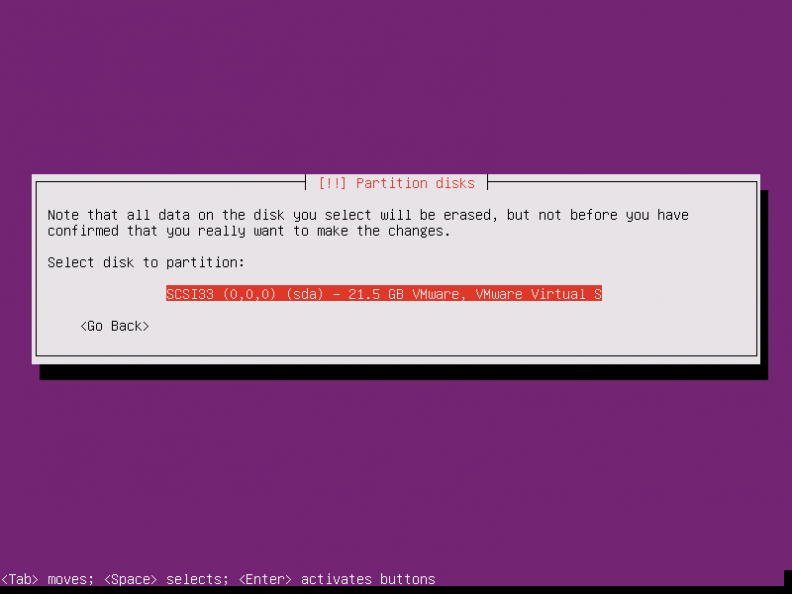
Select Disk Partition
14. Answer with Yes at the next screen in order to commit changes to disk with LVM scheme and hit on Continue to use the entire disk space for guided partitions.
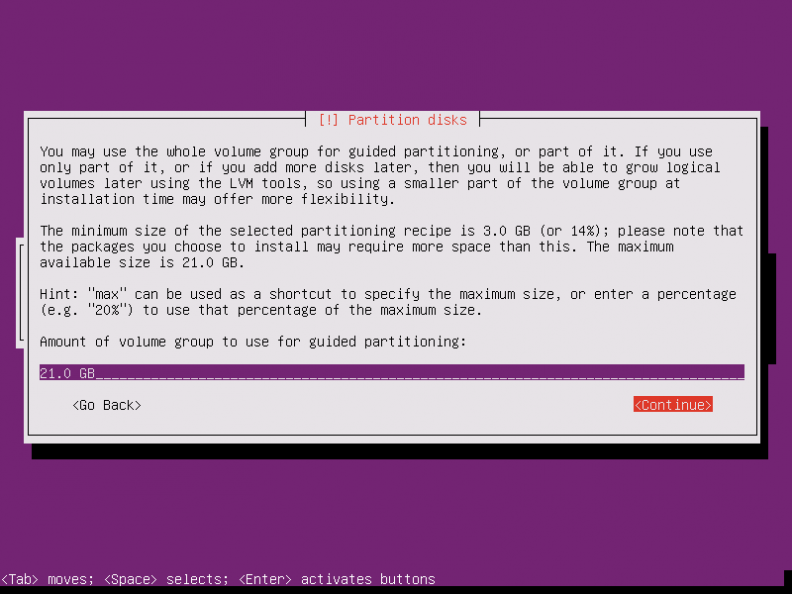
Add Disk Partition Size

Confirm Disk Partition Changes
15. Finally, approve for the last time the changes to be written to disk by pressing on Yes and the installation will now begin. From this step on all the changes will be committed to disk.

Confirm Disk Partition Changes
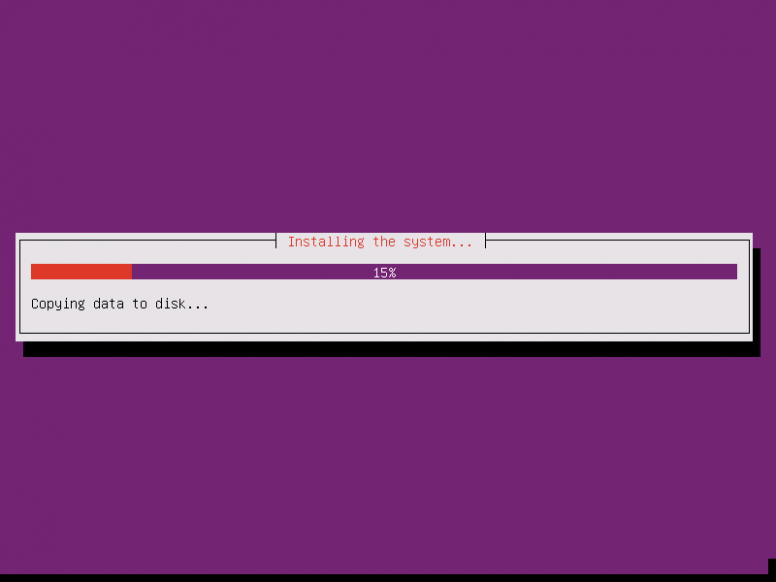
Installing Ubuntu 16.04 Server
16. In case your system is behind a proxy or a firewall use the next screen to bypass the network restrictions, otherwise just leave it black and hit on Continue.
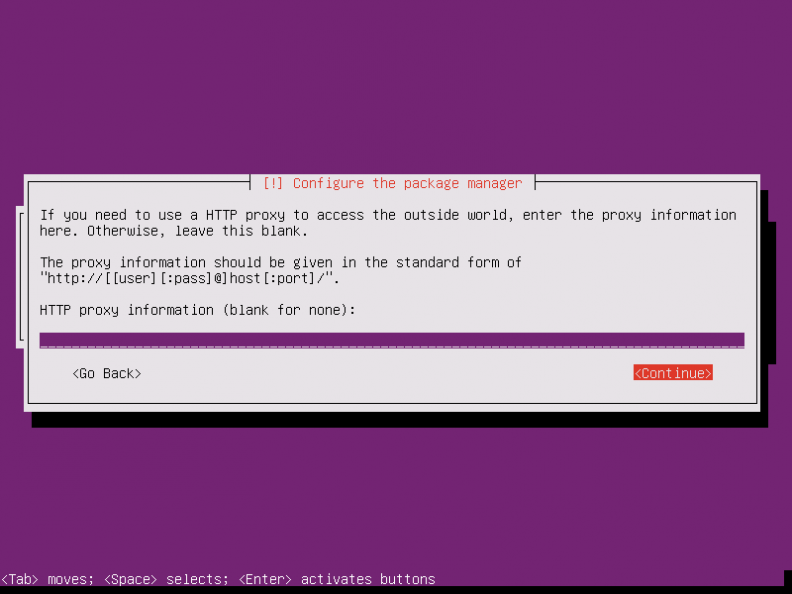
Configure System Package Manager
17. Next, the installer will configure apt repositories and will install the selected software. After it finishes the installation tasks a new screen will appear which will ask you how to manage the upgrade process. Select No automatic updates for now (you will manually select what updates are necessary) and hit Enter key to continue.
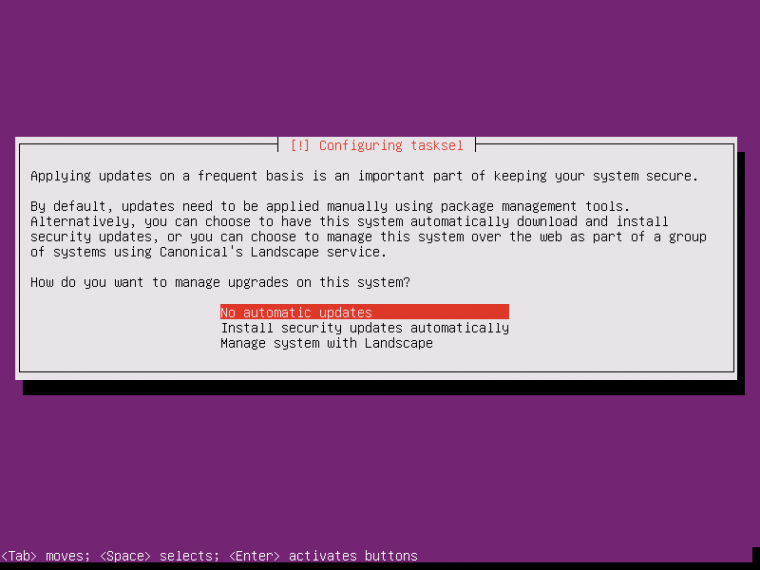
Manage Ubuntu 16.04 Upgrades
18. On the next step you will be asked to select what software to install. Select only standard system utilities and OpenSSH server (if you require remote access) by pressing the spacebar key and hit on Continue.
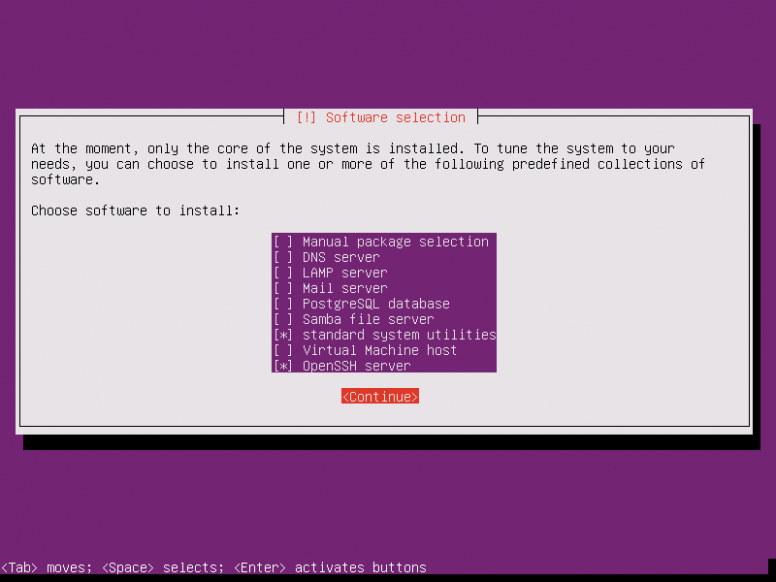
System Software Selection
19. Once the installer finishes installing the software, a new screen will prompt you whether to install the Grub boot loader to hard disk MBR (first 512 byte sector). Obviously without the GRUB you can’t boot up your system after restart, so hit on Yes to continue with the installation.
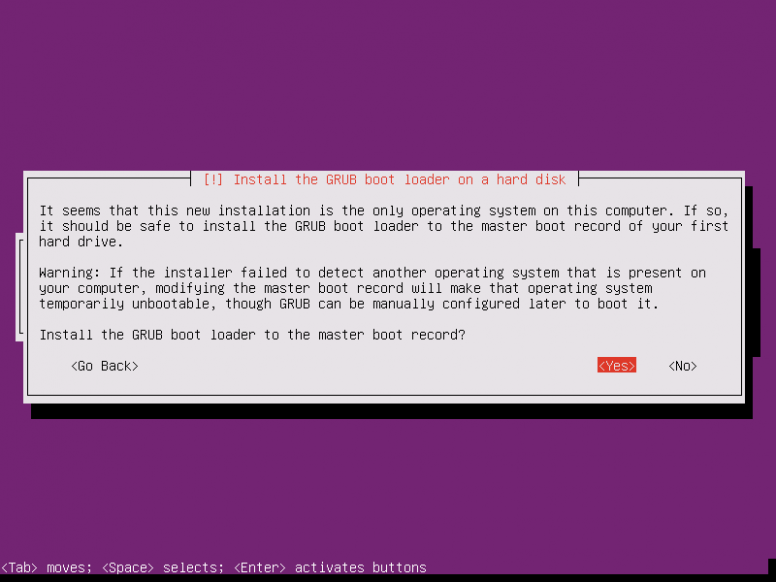
Install Grub Boot Loader
20. Finally, after the boot loader is written to Hard Disk MBR, the installation process finishes. Hit on Continue to reboot the machine and remove the installation media.
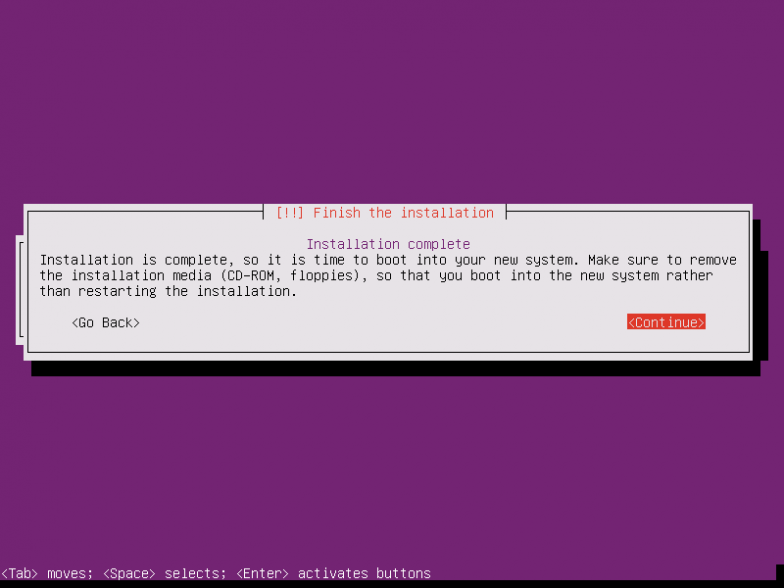
Finish Ubuntu 16.04 Server Installation
21. After reboot, login to your system console using the credentials configured during the installation process and you’re good to go on production with your server.
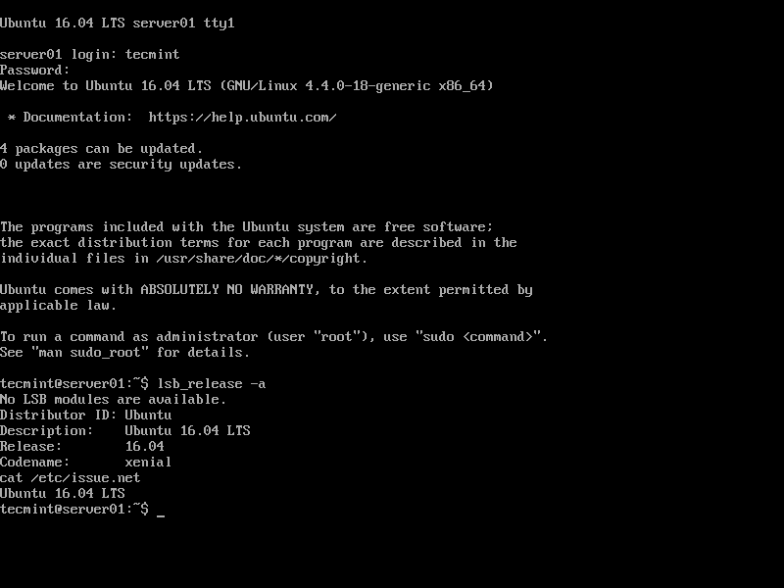
Ubuntu 16.04 Server Login Prompt
That’s all! Keep in mind that this version of Ubuntu has official maintenance support from Canonical until 2021 for hardware, bugs, software and security updates.
二 : Ubuntu 16.04 安装QQ的方法(图文说明)
最近,因为工作需要,我安装了Ubuntu16.04,然而有好多不便,工作上的事情大多需要QQ联系,然而在Ubuntu上的WebQQ很是不好用,于是在网上搜索了好多个linux版本的QQ,然而不是功能不全,就是界面丑到爆,要么就是不稳定;最后,找到了个人认为最好用的QQ—WineQQ。
再上一些装好之后的效果图

首先,介绍一下Wine这个软件。Wine是一个在x86、x86-64上容许类Unix操作系统在X Window System下运行Microsoft Windows程序的软件。另一方面,计算机程序设计师能经由Wine的程序库将视窗的程序转移至类Unix操作系统中运行。也有不少软件经过Wine测试后发布,比如Picasa,uTorrent,MediaCoder。(来源维基百科)而WineQQ就是在其平台上开发出来的QQ。
1. 废话少说,马上开始首先安装Wine
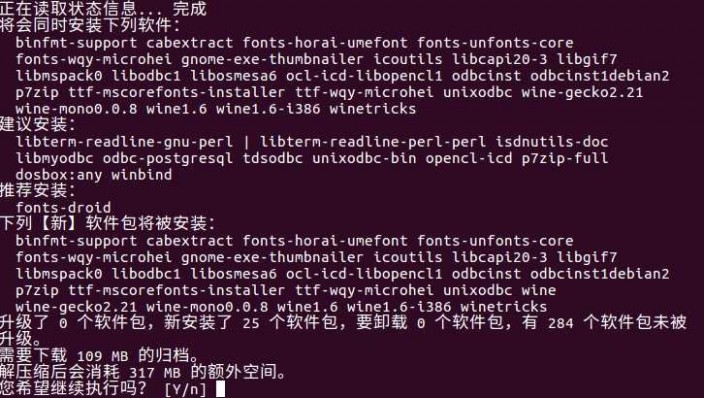
输入“y”,然后回车,出现如下画面时,留言文字到最后,通过tab键,切换至“确定”,回车继续。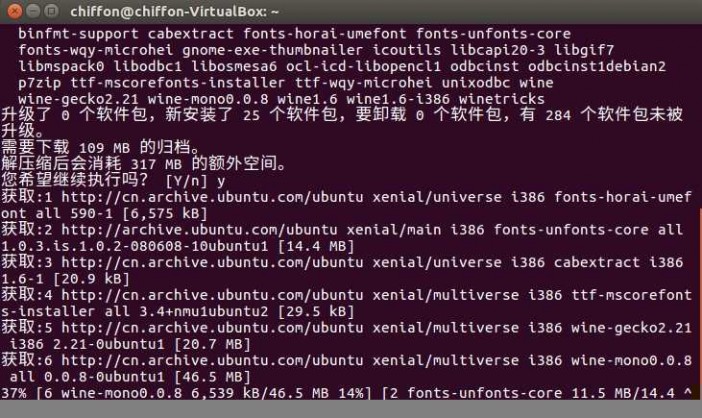
2. 下载QQ
打开网址http://www.ubuntukylin.com/application/show.php?lang=cn&id=279,下载wineQQ。
在安装之前,首先需要将下载的文件解压,解压缩我喜欢使用unar
sudo apt-get install unar
进入文件下载目录,解压并安装。
unar wine-qqintl.zipcd wine-qqintl
安装此目录下的所有文件
sudo dpkg –I fonts-wqy-microhei_0.2.0-beta-2_all.debsudo dpkg –I ttf-wqy-microhei_0.2.0-beta-2_all.debsudo dpkg –I wine-qqintl_0.1.3-2_i386.deb
解释下这个命令的意思,“dpkg ”是“Debian Packager ”的简写。为 “Debian” 专门开发的套件管理系统,方便软件的安装、更新及移除。所有源自“Debian”的“Linux ”发行版都使用 “dpkg”,例如 “Ubuntu”、“Knoppix ”等。dpkg –i 即为手工安装deb包到系统中,那么后面的就是文件名了,后缀是deb格式
至此,安装完毕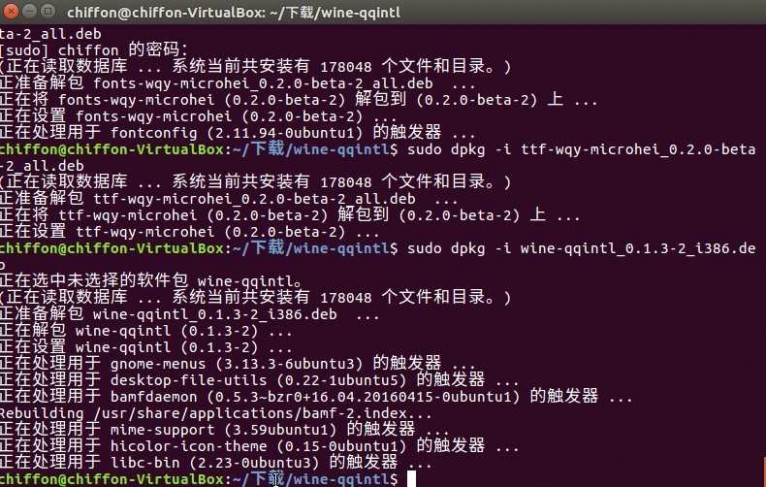
3. 运行
搜索栏输入“qq”,如下图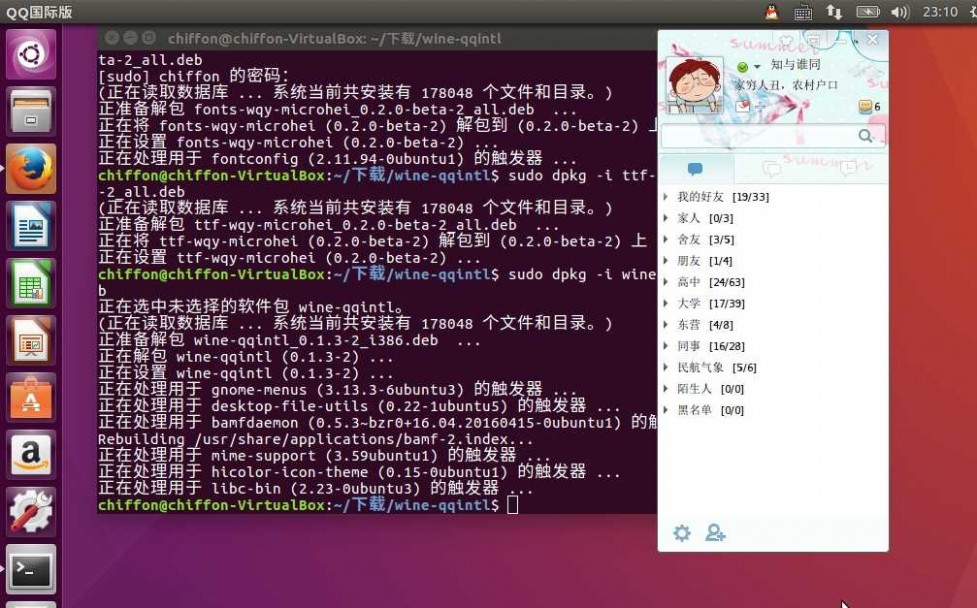

这样就完成了qq的安装,不懂的可以留言。
三 : Ubuntu 16.04怎么安装Snap Packages?
UbuntuLTS 16.04的Snap packages是安装应用程序的一个伟大的新途径。其中有“.snap”扩展名,更类似于容器。

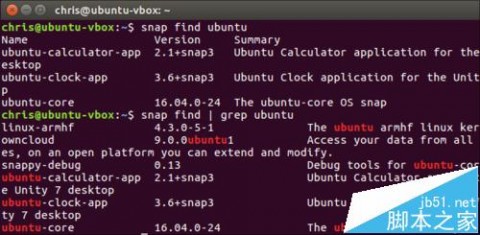
1、搜索可用的软件包管理单元,打开一个终端,运行以下命令:snap find

2、要搜索一个特定的软件包的名字,只是增加你的搜索词:snap find name
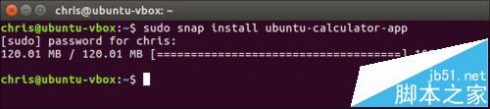
3、如何安装snap包,要安装snap包,请使用以下命令,通过名称指定软件包。 因为要对系统更改,您必须添加一个sudo的命令,以root权限运行它。sudo snap install package-name(安装包的名字)
4、您可以按Enter键启动应用程序或运行安装的命令
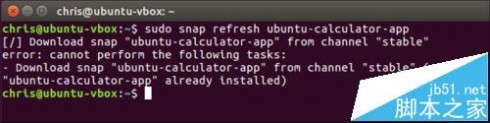
5、如何更新snap package,要更新已安装的捕捉包,运行以下命令sudo snap refresh package-name
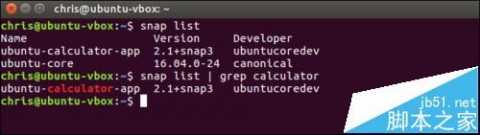
6、如何列出已安装的nap,要列出已安装的软件包管理单元,运行以下命令:snap list。您可以使用此命令,通过grep的再次搜索已安装的软件包:grep search
7、如何删除管理单元包,若要从计算机中删除已安装的包,运行以下命令:sudo snap remove package-name

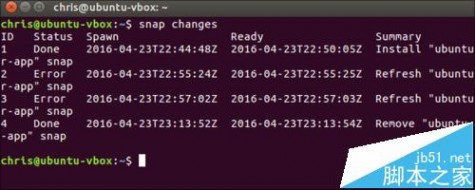
8、查看最近更新,运行以下命令来查看系统的更改列表。 这将显示你最近安装列表:snap changes
9、要查看更多snap命令操作运行下面的命令:man snap

相关推荐:
Ubuntu14.04怎么更换命令终端Terminal配色?
Ubuntu 16.04有哪些改变? 全新特性和改进大盘点
Ubuntu 16.04 LTS版本明日发布 重要更新内容汇总
四 : Ubuntu 15.04上安装Justniffer的详细教程
Justniffer 是一个可用于替代 Snort 的网络协议分析器。它非常流行,可交互式地跟踪/探测一个网络连接。它能从实时环境中抓取流量,支持 “lipcap” 和 “tcpdump” 文件格式。它可以帮助用户分析一个用 wireshark 难以抓包的复杂网络。尤其是它可以有效的帮助你分析应用层流量,能提取类似图像、脚本、HTML 等 http 内容。Justniffer 有助于理解不同组件之间是如何通信的。

功能
Justniffer 可以收集一个复杂网络的所有流量而不影响系统性能,这是Justniffer 的一个优势,它还可以保存日志用于之后的分析,Justniffer 其它一些重要功能包括:
1.可靠的 TCP 流重建
它可以使用主机 Linux 内核的一部分用于记录并重现 TCP 片段和 IP 片段。
2.日志
保存日志用于之后的分析,并能自定义保存内容和时间。
3.可扩展
可以通过外部的 python、 perl 和 bash 脚本扩展来从分析报告中获取一些额外的结果。
4.性能管理
基于连接时间、关闭时间、响应时间或请求时间等提取信息。
安装
Justniffer 可以通过 PPA 安装:
运行下面命令添加库:
$ sudo add-apt-repository ppa:oreste-notelli/ppa
更新系统:
$ sudo apt-get update
安装 Justniffer 工具:
$ sudo apt-get install justniffer
make 的时候失败了,然后我运行下面的命令并尝试重新安装服务
$ sudo apt-get -f install
示例
首先用 -v 选项验证安装的 Justniffer 版本,你需要用超级用户权限来使用这个工具。
$ sudo justniffer -V
示例输出:

1.以类似 apache 的格式导出 eth1 接口流量,显示到终端。
$ sudo justniffer -i eth1
示例输出:
2.可以用下面的选项跟踪正在运行的tcp 流
$ sudo justniffer -i eth1 -r
示例输出:
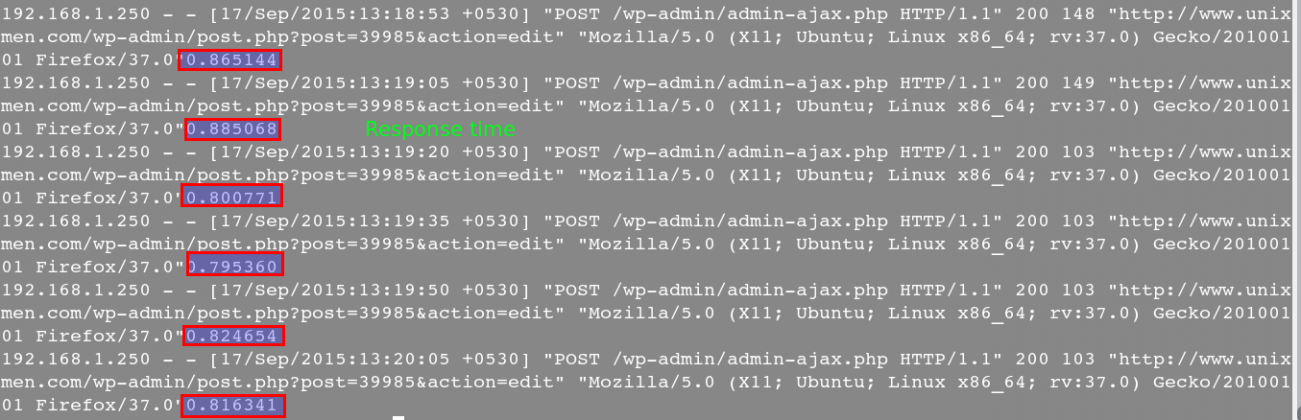
3.获取 web 服务器的响应时长
$ sudo justniffer -i eth1 -a " %response.time"
示例输出:
4.使用 Justniffer 读取一个 tcpdump 抓取的文件
首先,用 tcpdump 抓取流量。
$ sudo tcpdump -w /tmp/file.cap -s0 -i eth0
然后用 Justniffer 访问数据
$ justniffer -f file.cap
示例输出:

5.只抓取http 数据
$ sudo justniffer -i eth1 -r -p "port 80 or port 8080"
示例输出:
6.获取一个指定主机的 http 数据
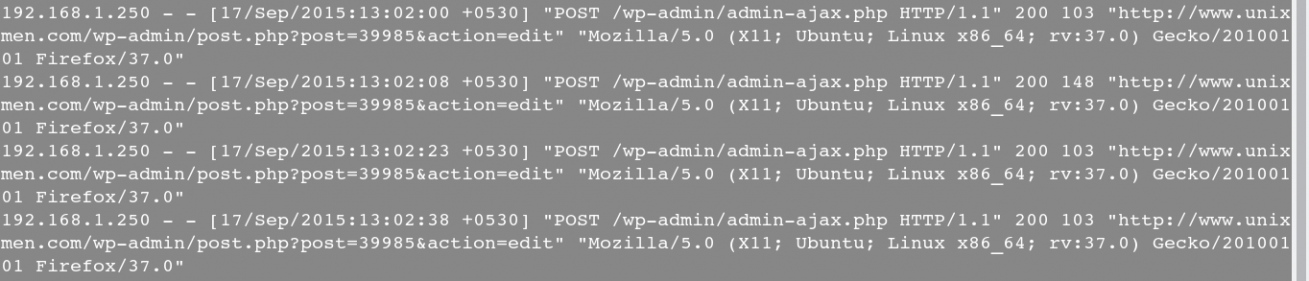
$ justniffer -i eth1 -r -p "host 192.168.1.250 and tcp port 80"
示例输出:
7.以更精确的格式抓取数据
当你输入 justniffer -h 的时候你可以看到很多用于以更精确的方式获取数据的格式关键字。
$ justniffer -h
示例输出:

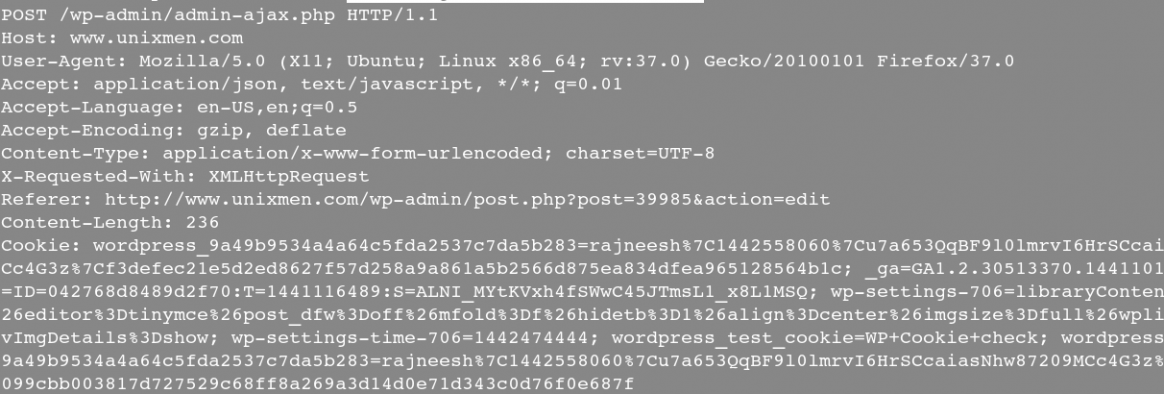
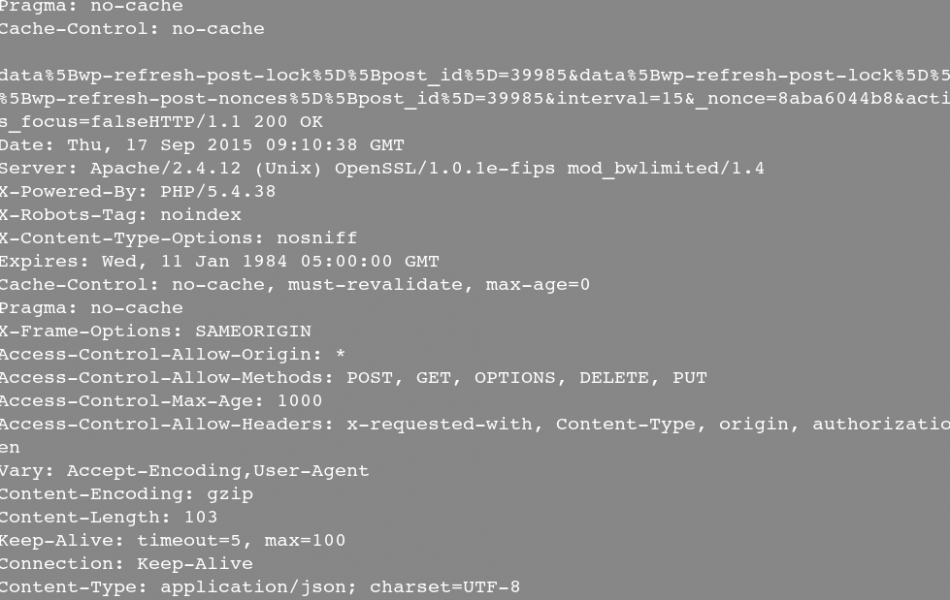
让我们用 Justniffer 根据预先定义的参数提取数据。
$ justniffer -i eth1 -l "%request.timestamp %request.header.host %request.url %response.time"
示例输出:

其中还有很多你可以探索的选项。
总结
Justniffer 是一个很好的用于网络测试的工具。在我看来对于那些用 Snort 来进行网络探测的用户来说,Justniffer 是一个更简单的工具。它提供了很多 格式关键字 用于按照你的需要精确地提取数据。你可以用.cap 文件格式记录网络信息,之后用于分析监视网络服务性能。
五 : Ubuntu 11.04 手动安装flash插件方法
今天下载了一个ubuntu 11.04,系统默认用到firefox 4.0,没有flash插件,这个不奇怪,奇怪的是通过系统自动插件寻找也居然找不到!(这个太不能原谅了)。
实际上我觉得系统应该把flash插件装好,很简单的事情啊,why not?(本来ubuntu是有很好的在线更新机制的,可惜那些网站都在国外,甚至有些是被屏蔽的,对中国人来说,这个本来应该是优点的在线更新反而变成了噩梦)
自己动手吧:
1.下载flash插件linux二进制包
下载地址是:http://get.adobe.com/flashplayer/
请注意,不要去下载apt 包,下载回来也装不起。(这点我实在无语,对ubuntu,免费和商业的东西确实有差距啊)
应该下载tar.gz for other linux包就对了。
2.解压
tar zvxf install_flash_player_10_linux.tar.gz
关键文件其实就一个:
libflashplayer.so
当然这个包里面还带了一个usr的目录(这个目录里面还附带了一些设置程序),只需要将他cp到(合并)到对应系统目录下即可。
然后重新启动firefox,flash就可以工作正常了!
注:firefox 5.0的插件安装方式又不一样,是在/usr/lib/adobe-flashplugin下面。然后在/usr/lib/mozilla/plugins下面建立一个flashplugin-alternative.so符号链接到/etc/alternatives/mozilla-flashplugin,而/etc/alternatives/mozilla-flashplugin又符号链接到真正的插件文件usr/lib/adobe-flashplugin/libflashplayer.so。
因此firefox5.0的区别就是插件的名字不一样,以前是libflashplayer.so,现在变成了flashplugin-alternative.so,因此搞懂了这个区别,直接把/usr/lib/mozilla/plugins下的libflashplayer.so插件改名为flashplugin-alternative.so,也一样可以工作了。
本文标题:ubuntu 11.04 安装-Ubuntu 16.04 Server Edition 英文版安装教程61阅读| 精彩专题| 最新文章| 热门文章| 苏ICP备13036349号-1